C/C++基础学习 环境搭建 windows环境基础搭建:这个不介绍一路下一步就行
linux环境基础搭建:
我是搭建在Ubuntu上的:
1
2
3
4
5
6
7
8
9
10
11
# 首先更新一下源 sudo apt update # 安装一个文本编辑器 sudo apt install vim # 安装gcc sudo apt install gcc # 安装g++ sudo apt install g++
让我来写第一个代码并将其编译看看是否已经下载完毕:
Hello.c:
1 2 3 4 5 #include <stdio.h> int main () printf ("Hello World" ); return 0 ; }
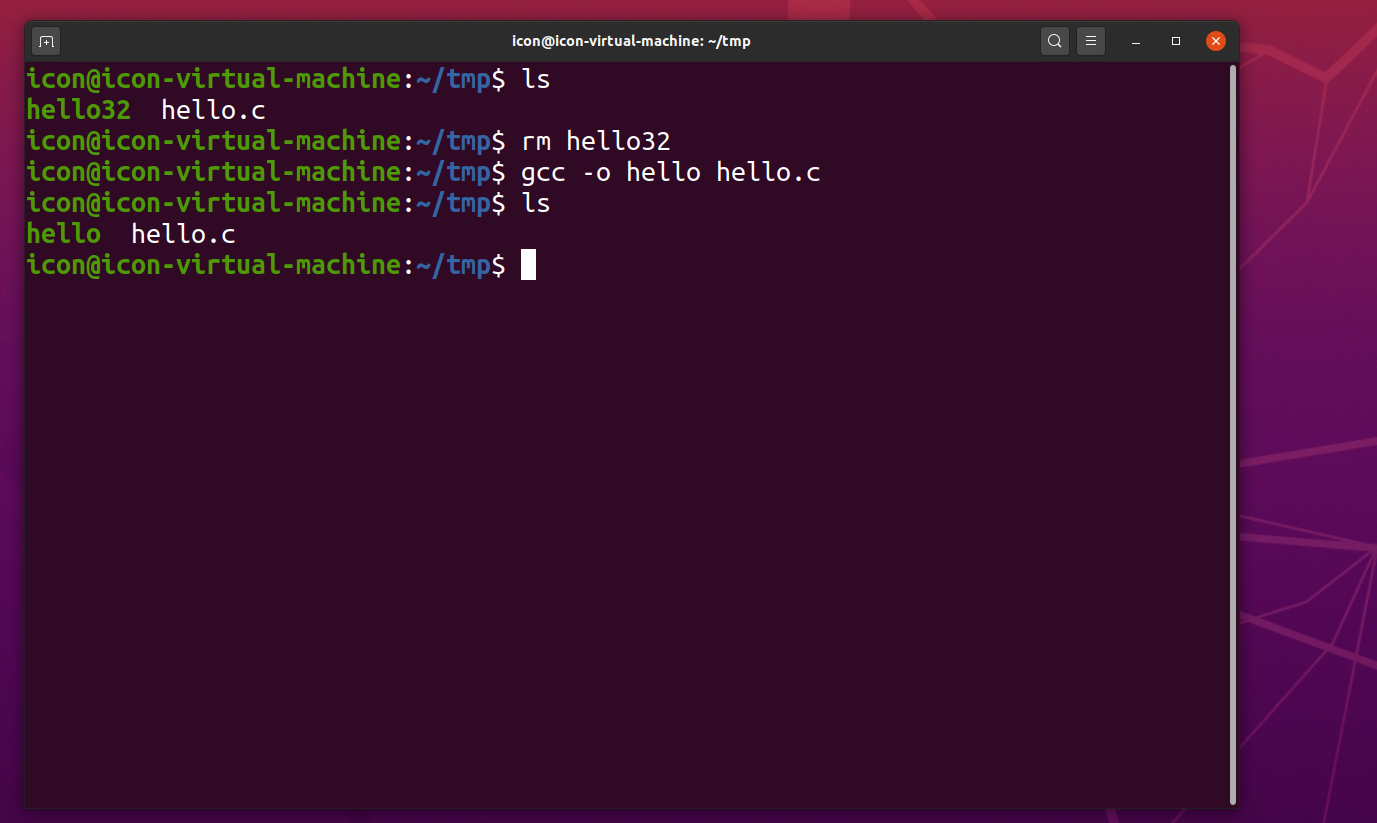
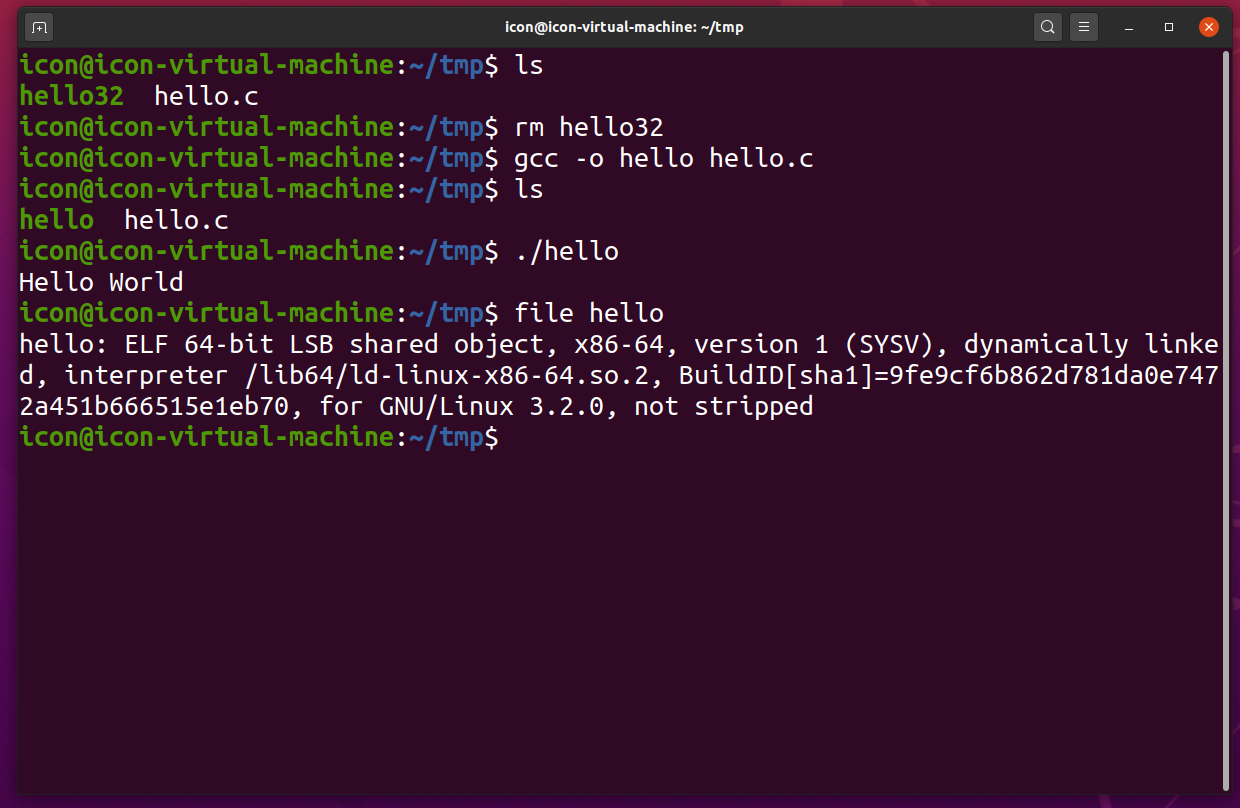
编译.c文件成可执行文件:
gcc -o hello hello.c
执行这个可执行文件:
因为我们的Ubuntu系统是64位的系统,所以他也默认给我们生成了64位的文件。
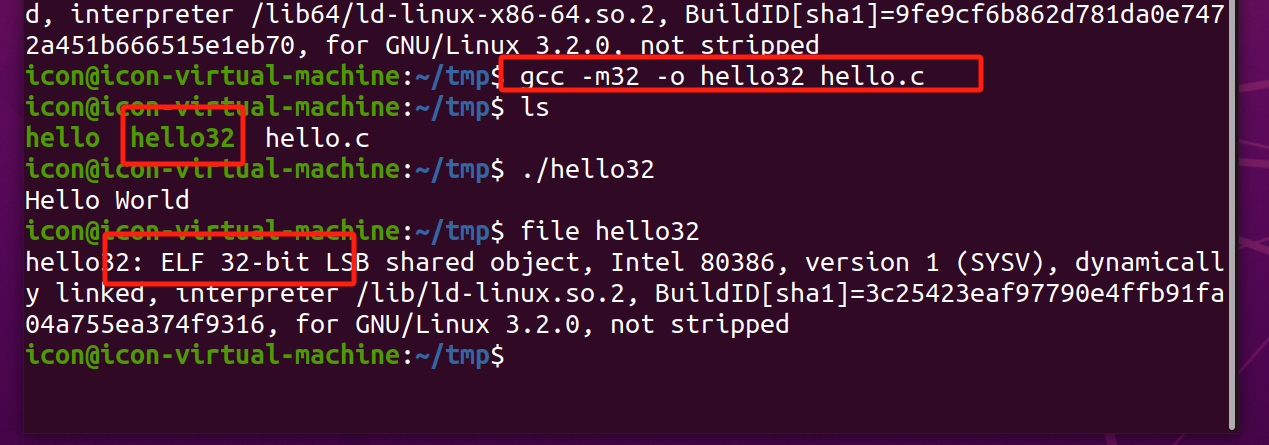
我们可以下载如下库这样就支持我们编译成32位的文件了
1
2
sudo apt install gcc-multilib sudo apt install g++-multilib
编译成32位文件:
gcc -m32 -o hello32 hello.c
第一个c++代码:
hello1.cpp
1 2 3 4 5 6 #include <iostream> int main () std::cout << "Hello World!" << std::endl; return 0 ; }
编译c++代码:
g++ -o hello1 hello1.cpp
上述做好以后我们还需要下载一个调试器
1
2
3
sudo apt install gdb sudo apt install nasm
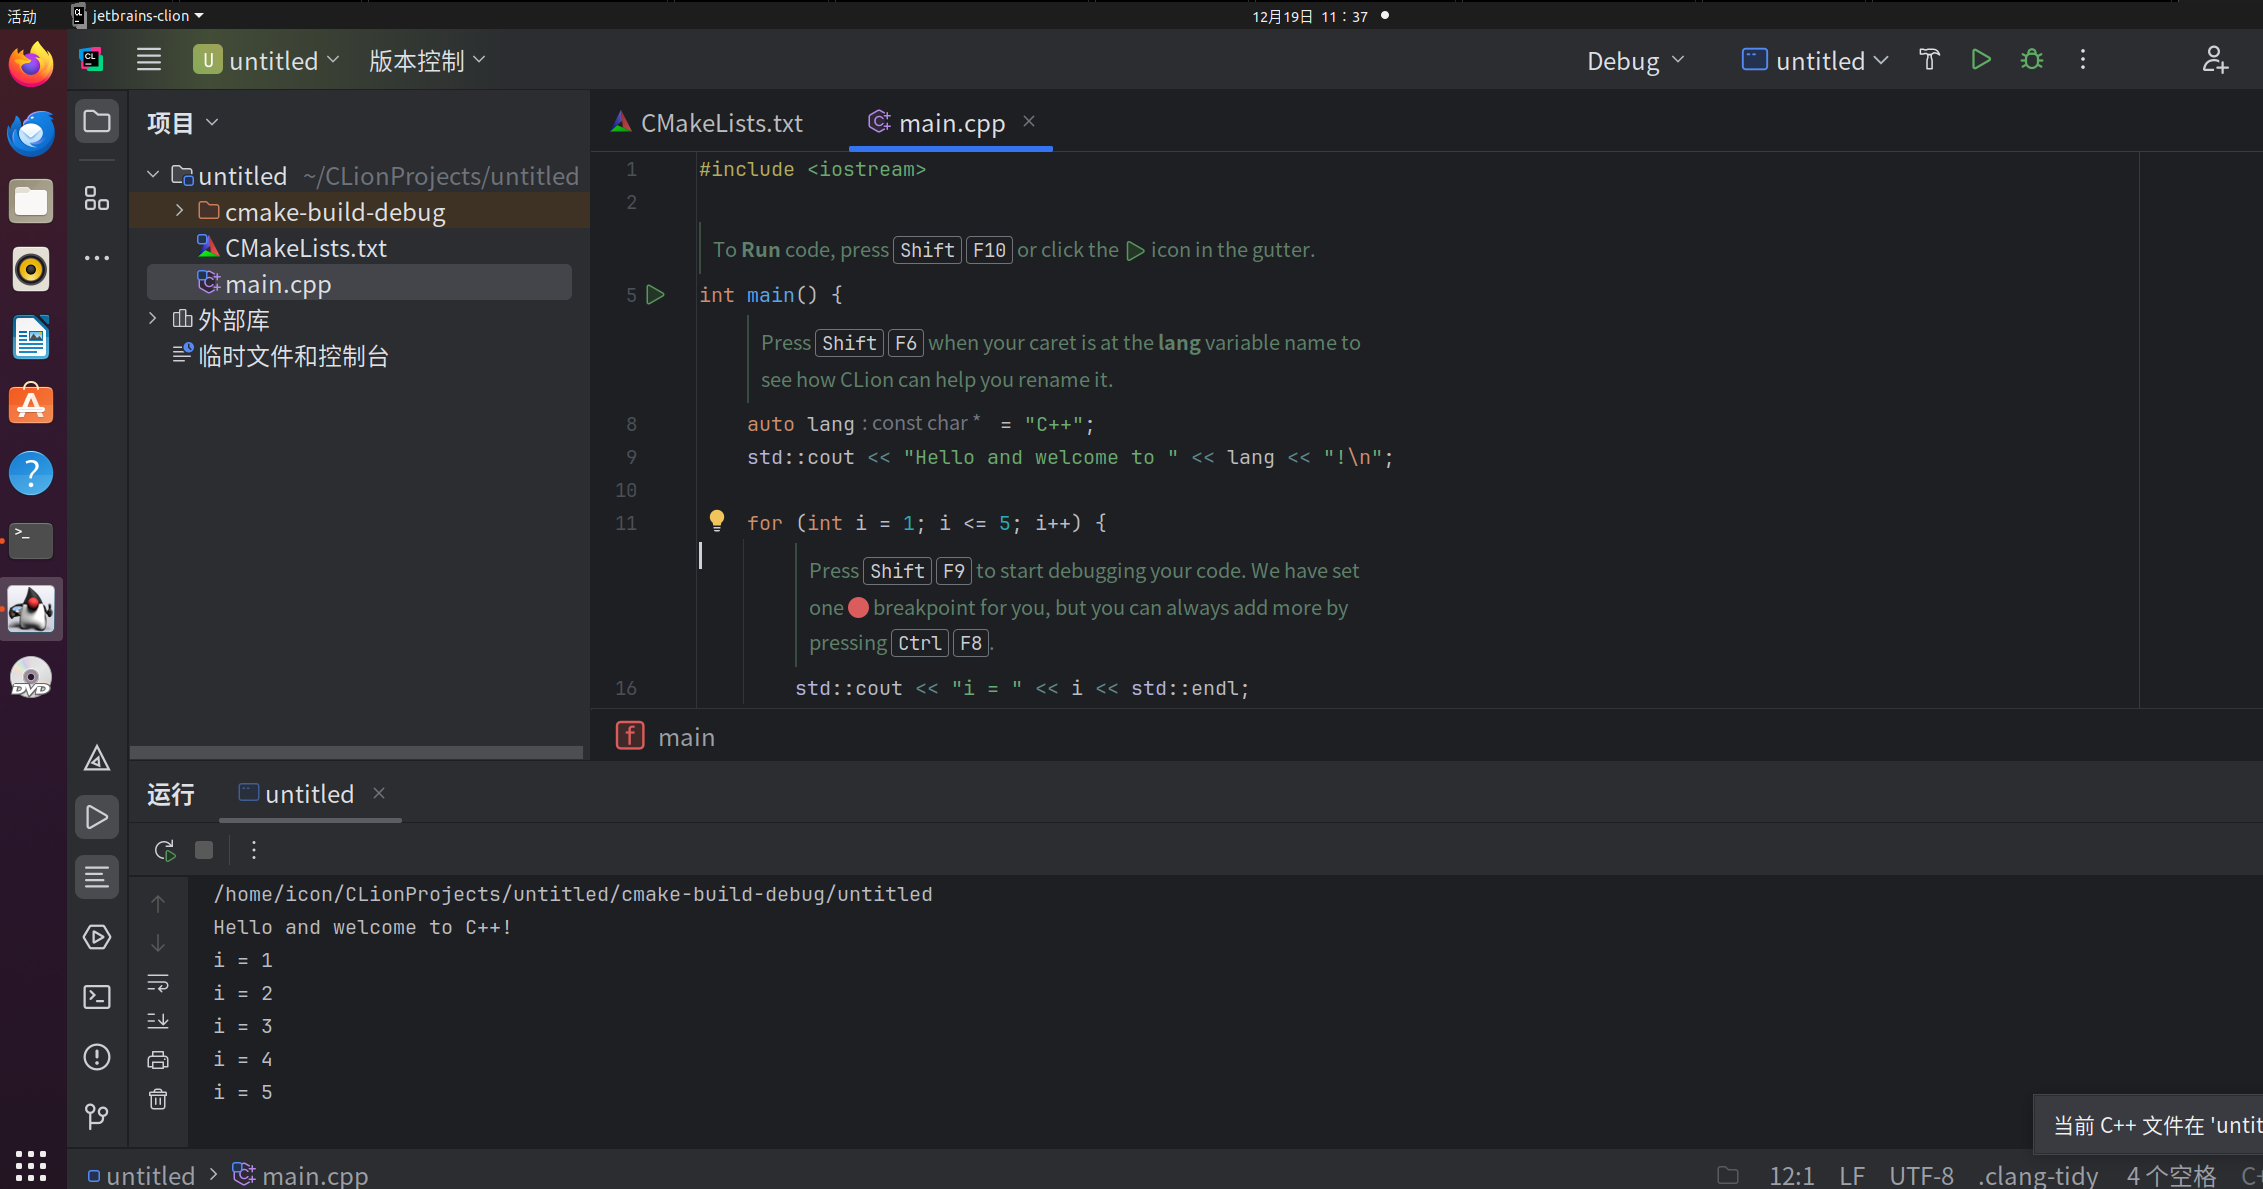
然后再安装一个类似于VScode的IDE
这里我选择破解clion好用放在tool这个目录下了。
破解过程网上都是教程。
至此linux环境就配置完毕了。
第一个C&C++程序 创建项目步骤:
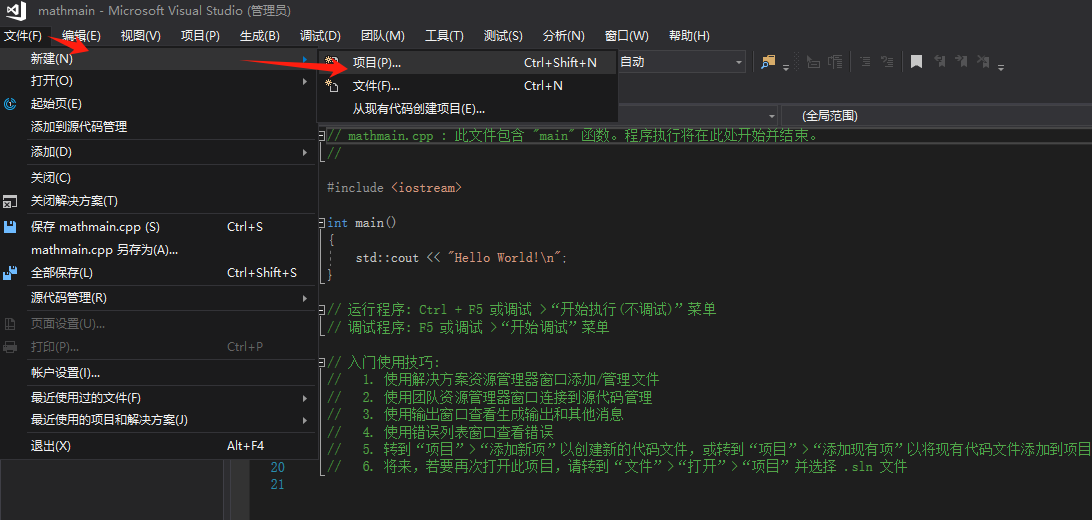
新建——>文件——>新建项目
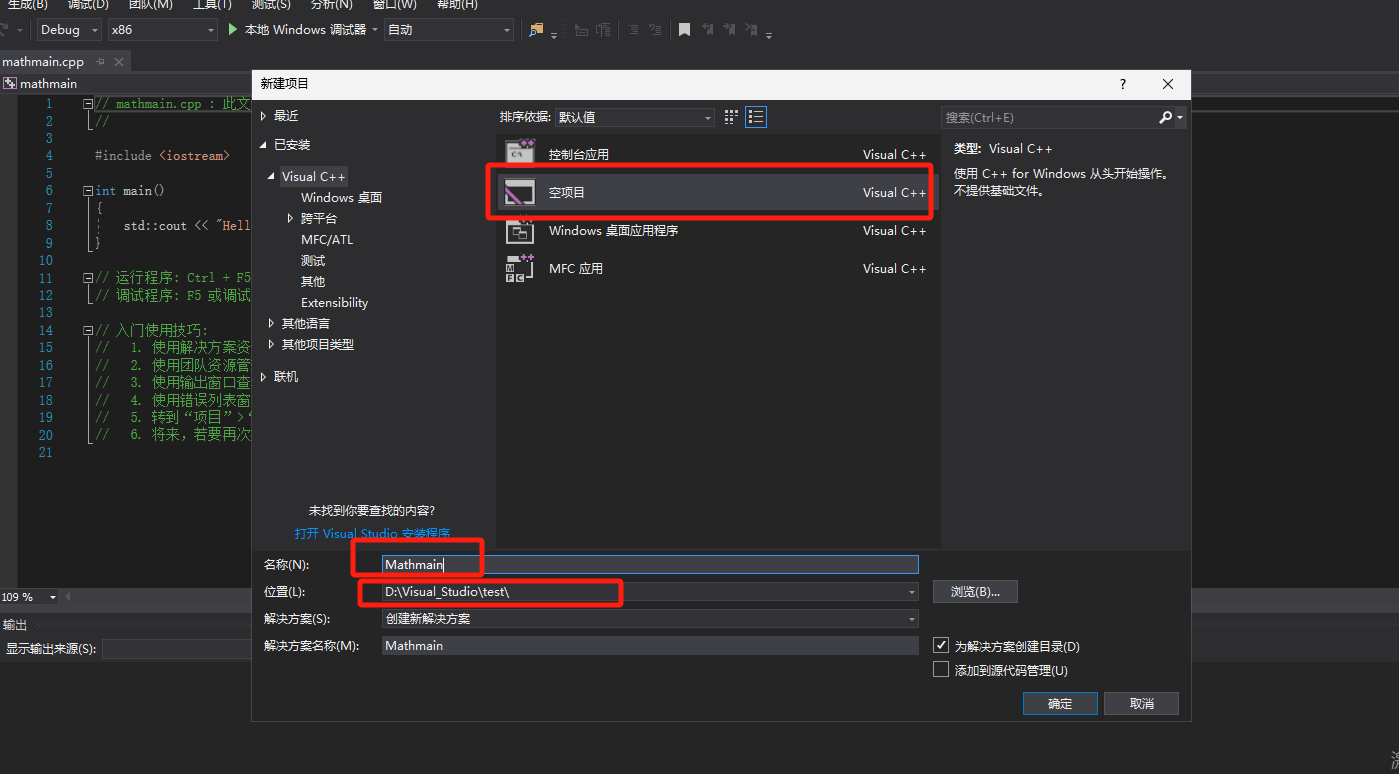
选择空项目——>给项目命名,选择项目路径
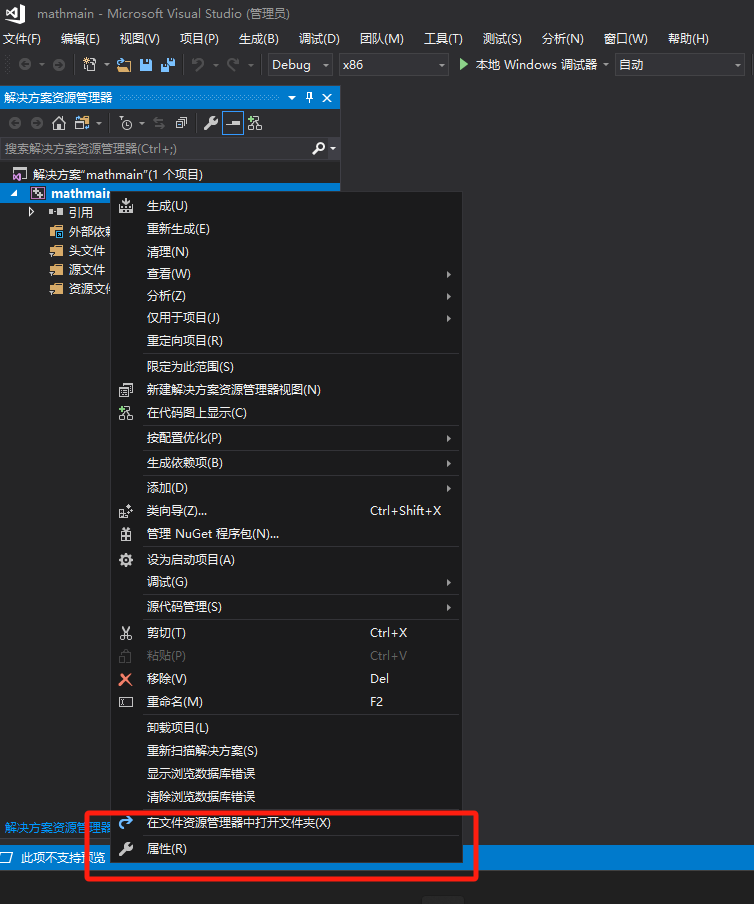
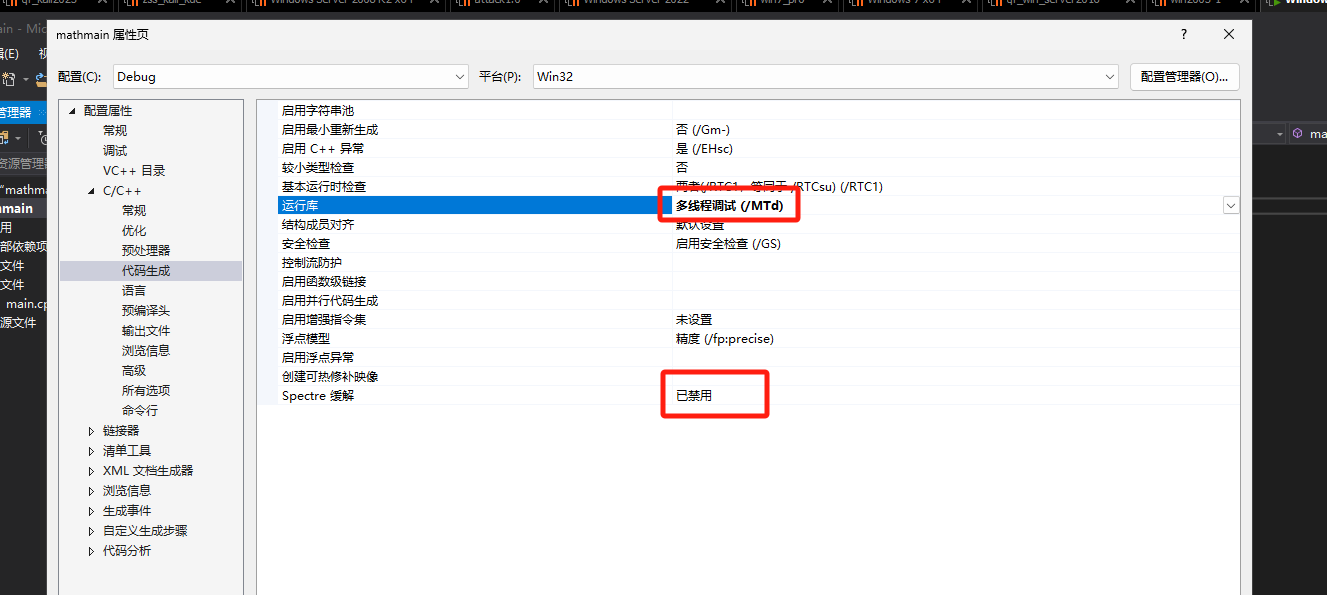
右键并点击属性:
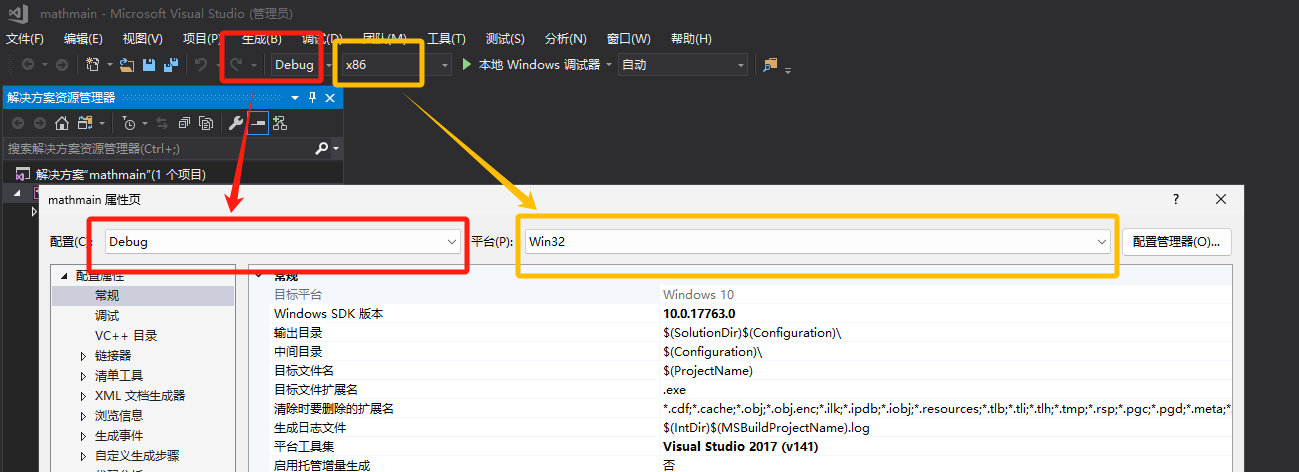
一一对应:当然平台也可以直接选择所有平台
Debug是调试版,release是发行版
后续运行代码如果出现问题可以看看这两个设置有没有设置出问题:
解读这个小程序:
1 2 3 4 5 6 7 8 9 10 11 12 13 14 15 #include <stdio.h> int main () { printf ("Hello World!\r\n" ); return 0 ; }
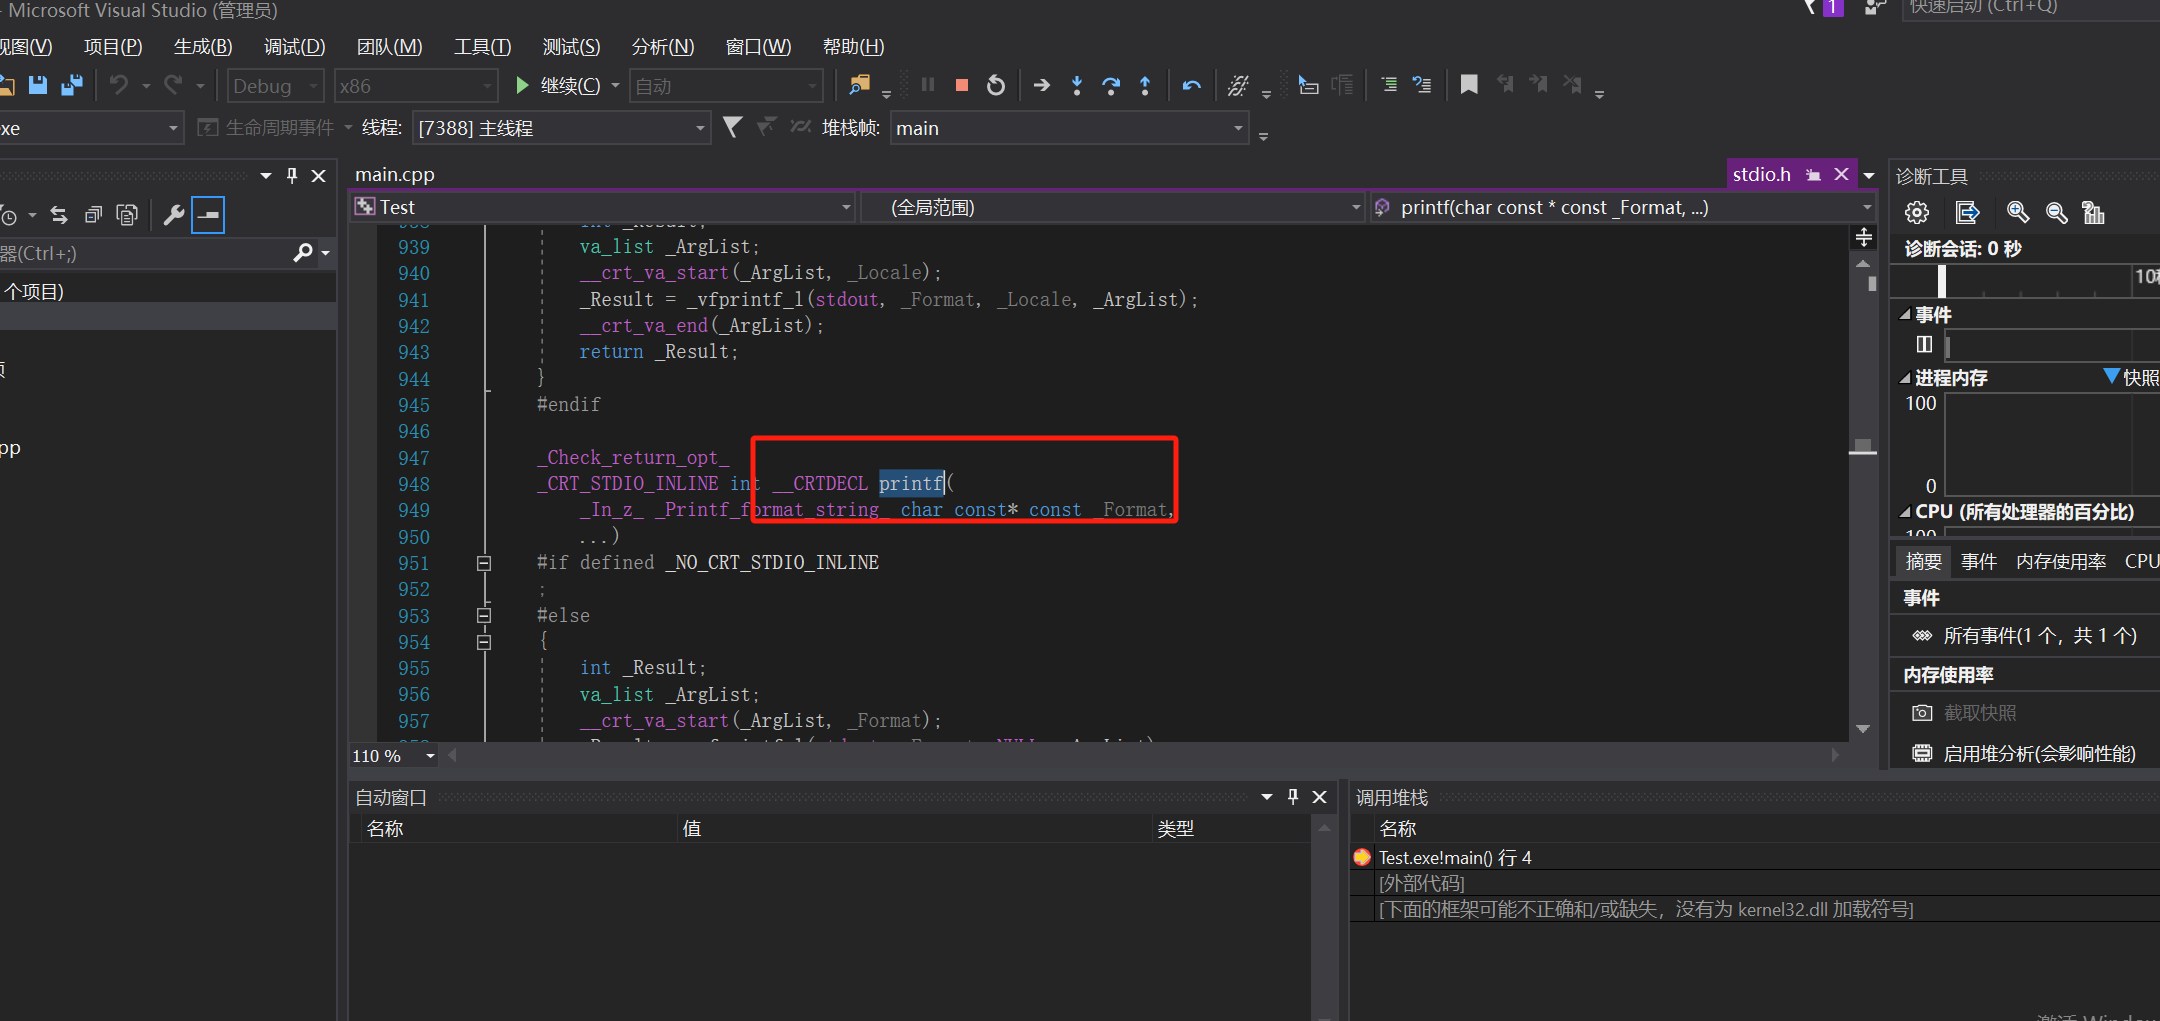
printf也是一个函数,我们直接点击其然后F12跟进查看:其函数相关定义:
这个函数是一个什么函数呢?
printf是一个库函数,c/c++提供给我们的函数就是库函数,库函数之所以称之为库函数,是因为调用这些函数需要依赖于c/c++的运行库(runtime)
可以自己写一个头文件内容
1 2 3 #pragma once int test = 12138 ;
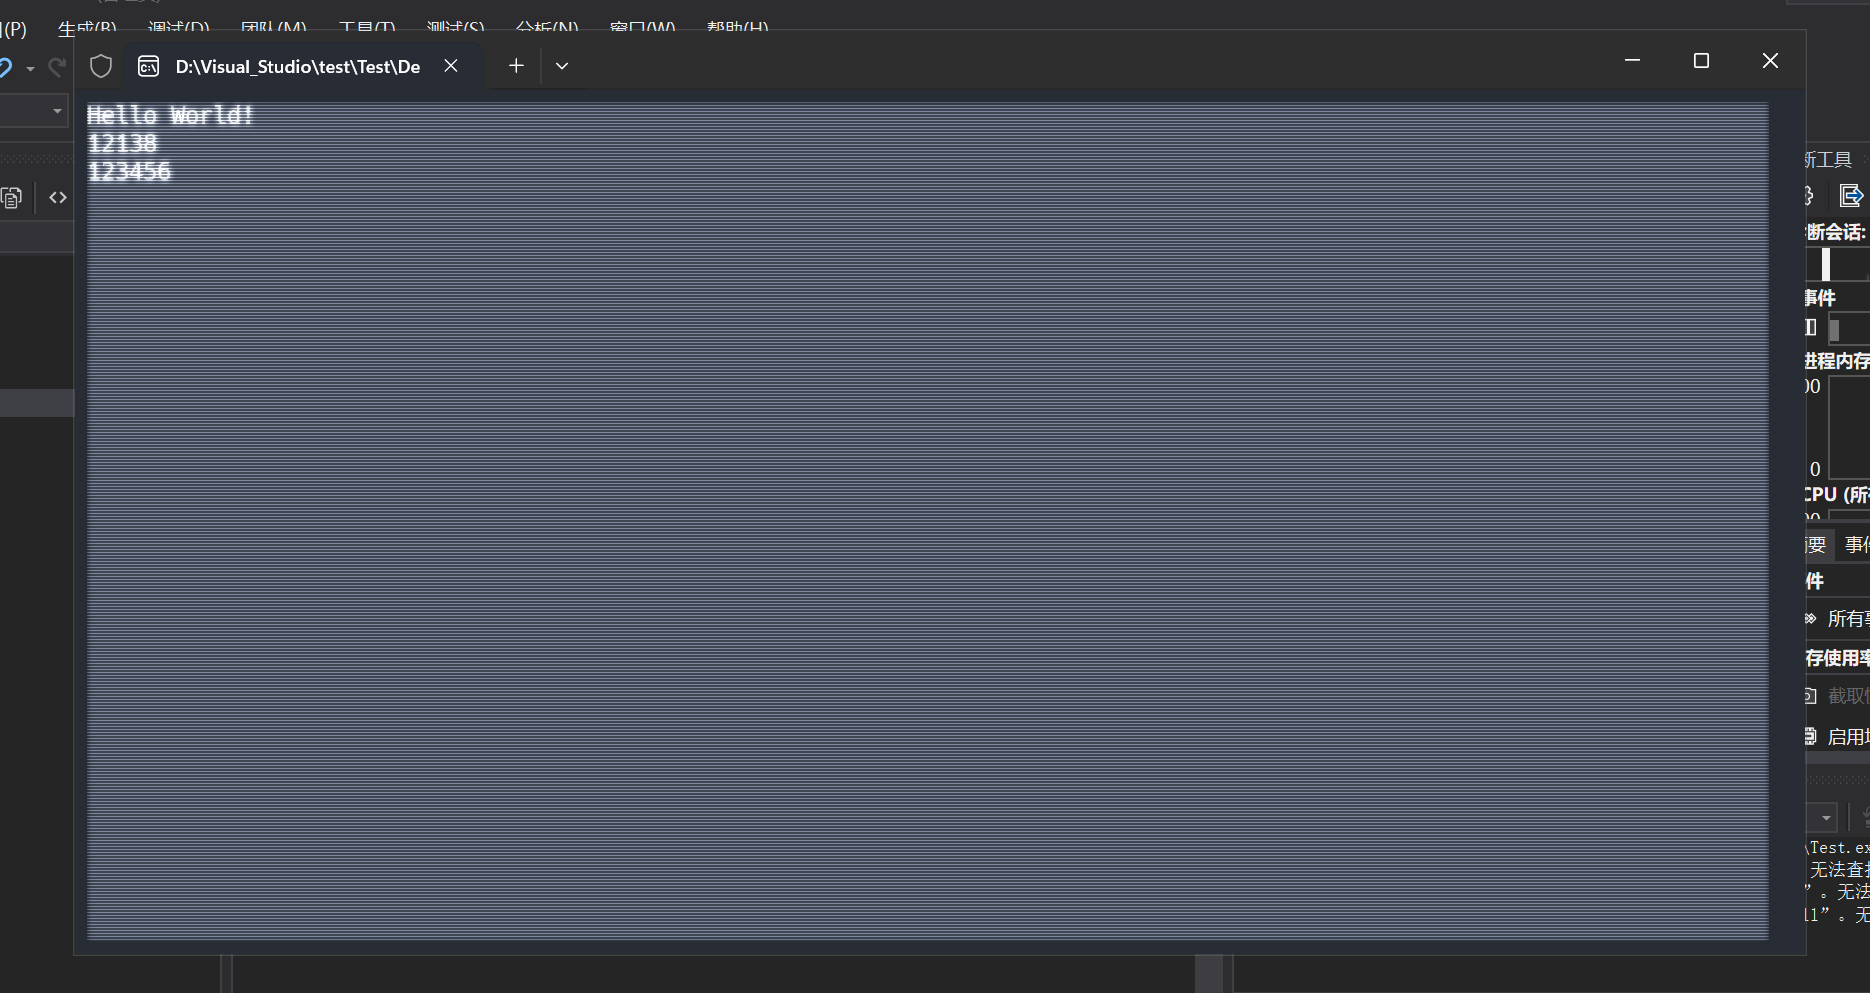
1 2 3 4 5 6 7 8 9 10 11 12 13 14 15 16 17 18 19 20 21 22 23 24 25 26 27 28 29 30 31 32 33 34 35 36 37 38 39 #include <stdio.h> #include "main.h" int main () { printf ("Hello World!\r\n" ); printf ("%d\r\n" , test); test = 123456 ; printf ("%d" , test); return 0 ; }
输出如下:
一个c代码在运行时会经历如下几步:
这里用ubuntu展示会更加清晰:
预处理 编译 汇编 链接
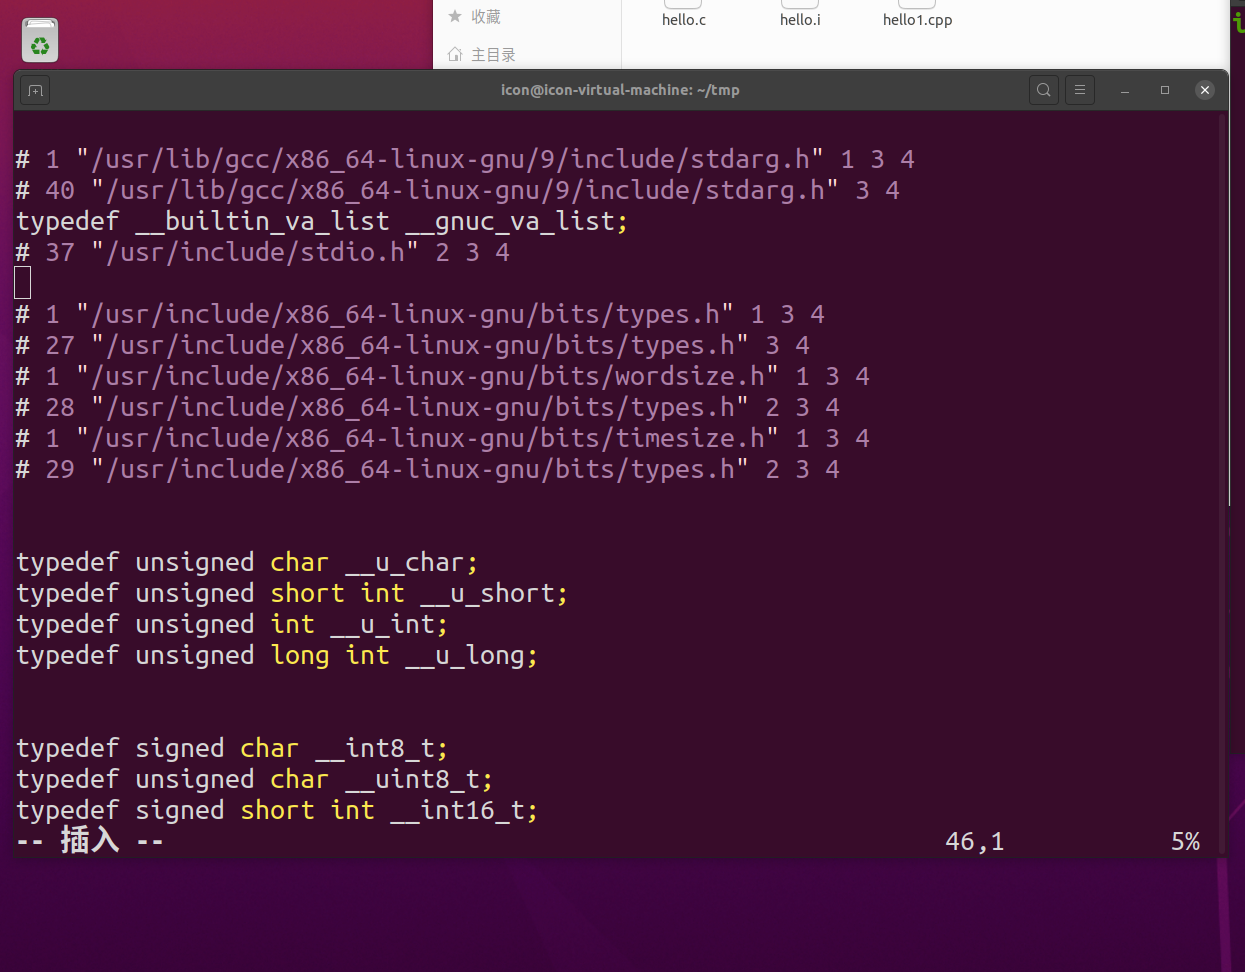
预处理gcc -E hello.c -o hello.i
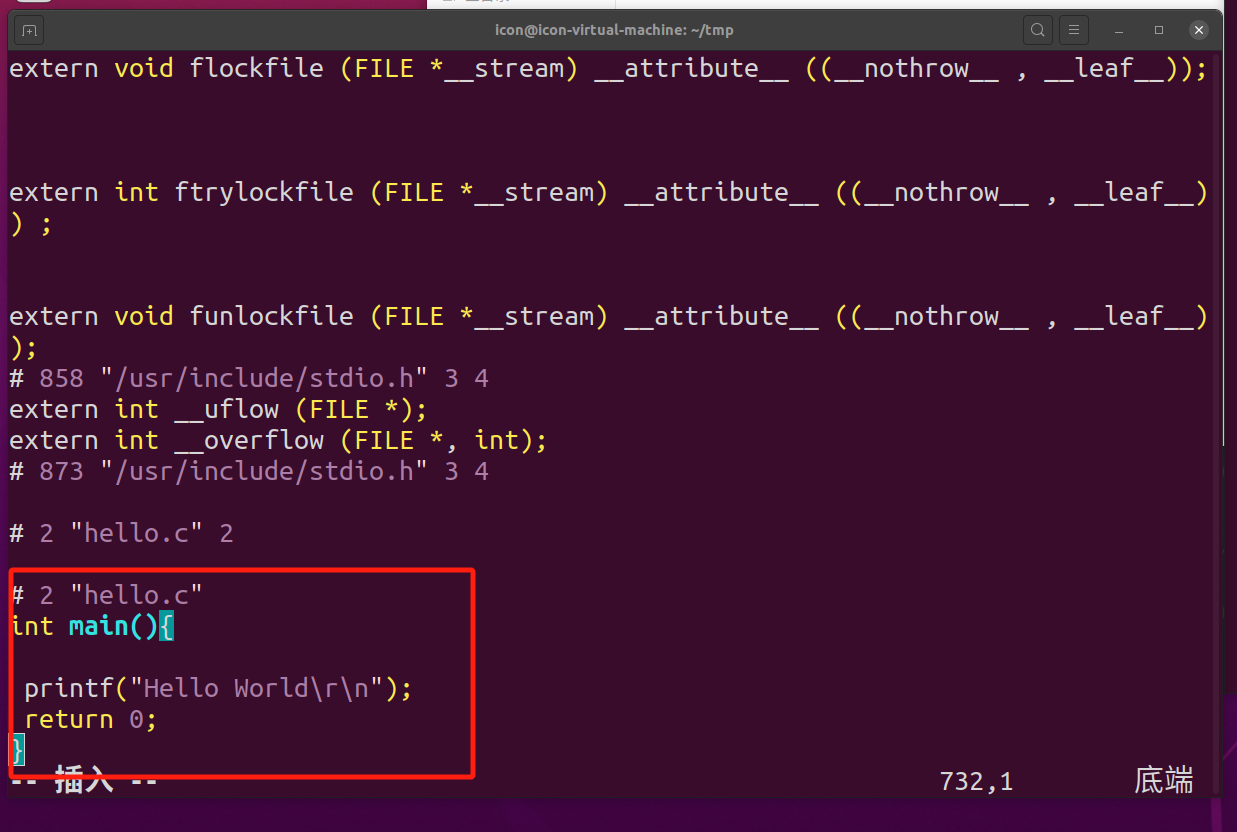
预处理相当于是把头文件中的声明,代码全部粘贴到当前文件中来:
上面的实际上就是<stdio.h>当中的东西,直接复制到了这里
我们自己写的代码已经在非常非常后面了
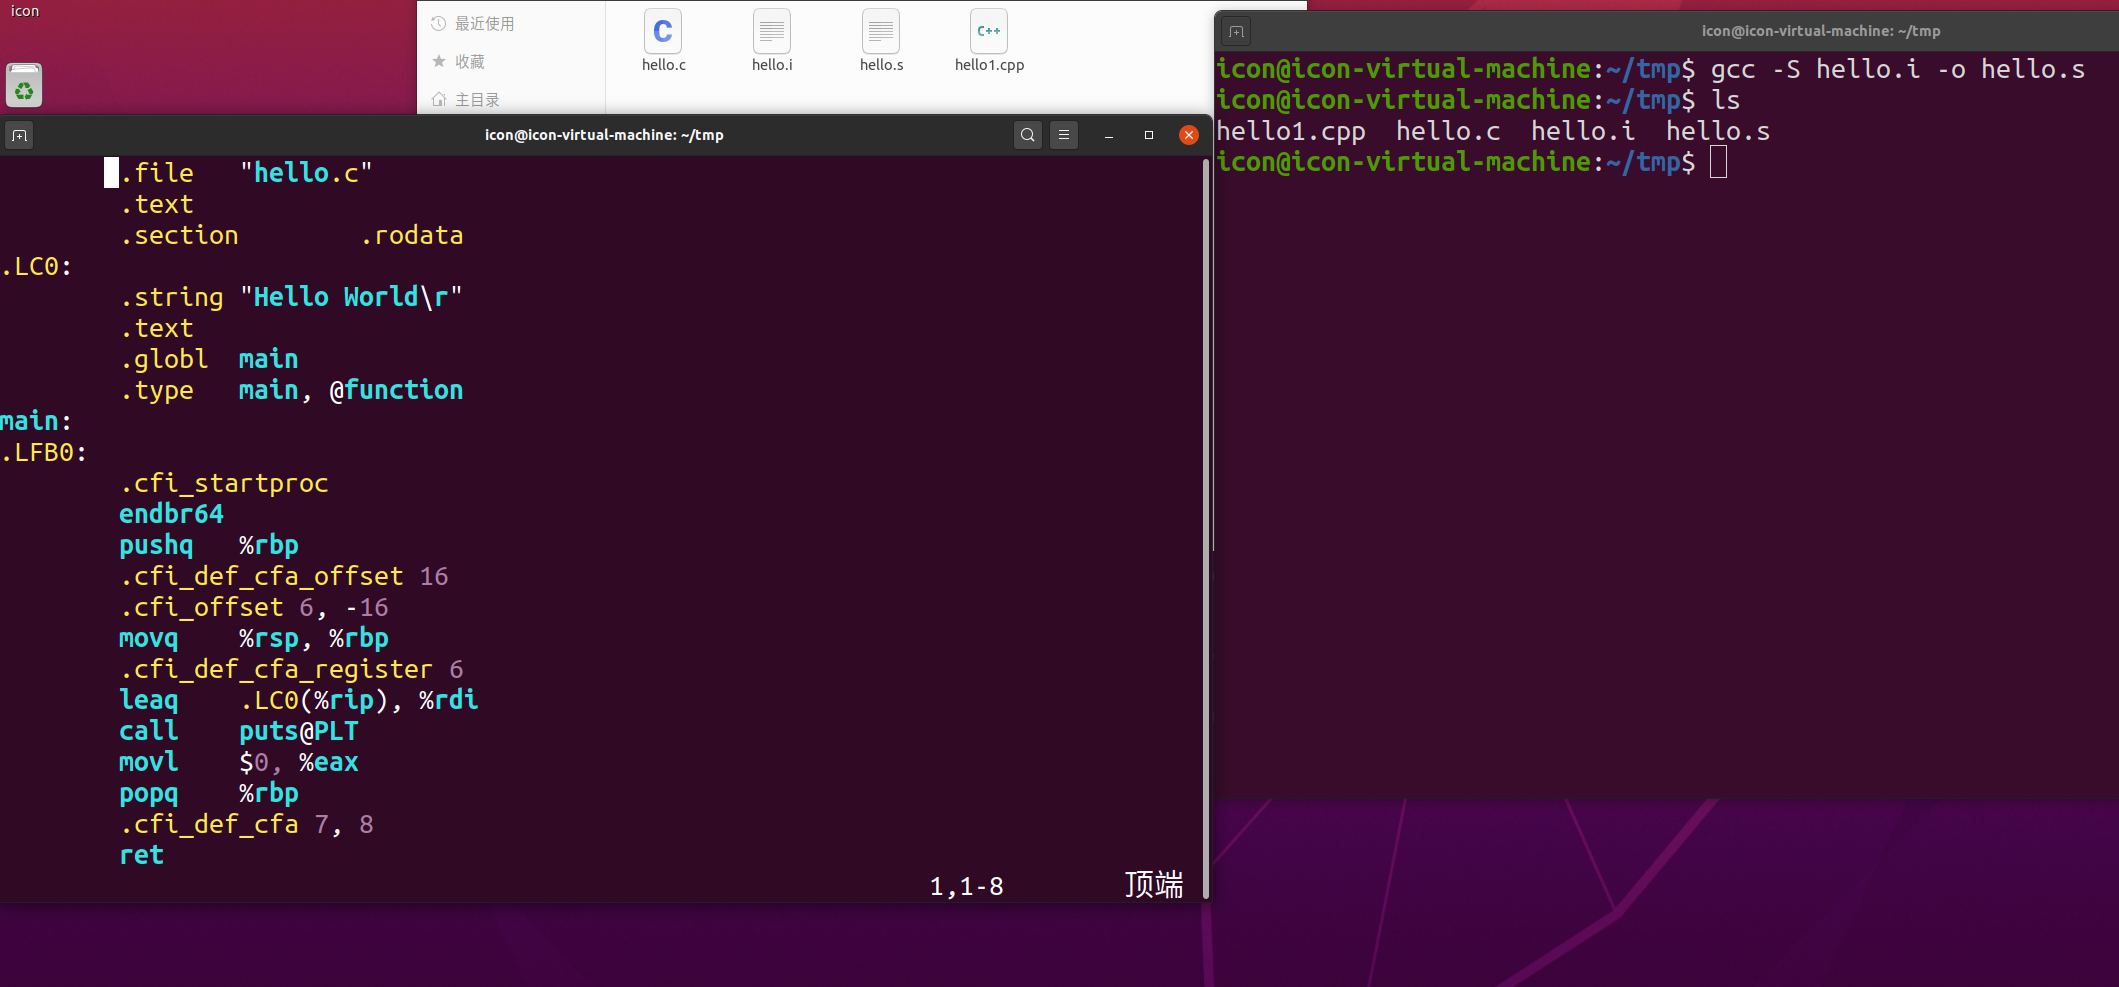
编译gcc -S hello.i -o hello.s
编译将我们的c代码编译成了汇编语言:
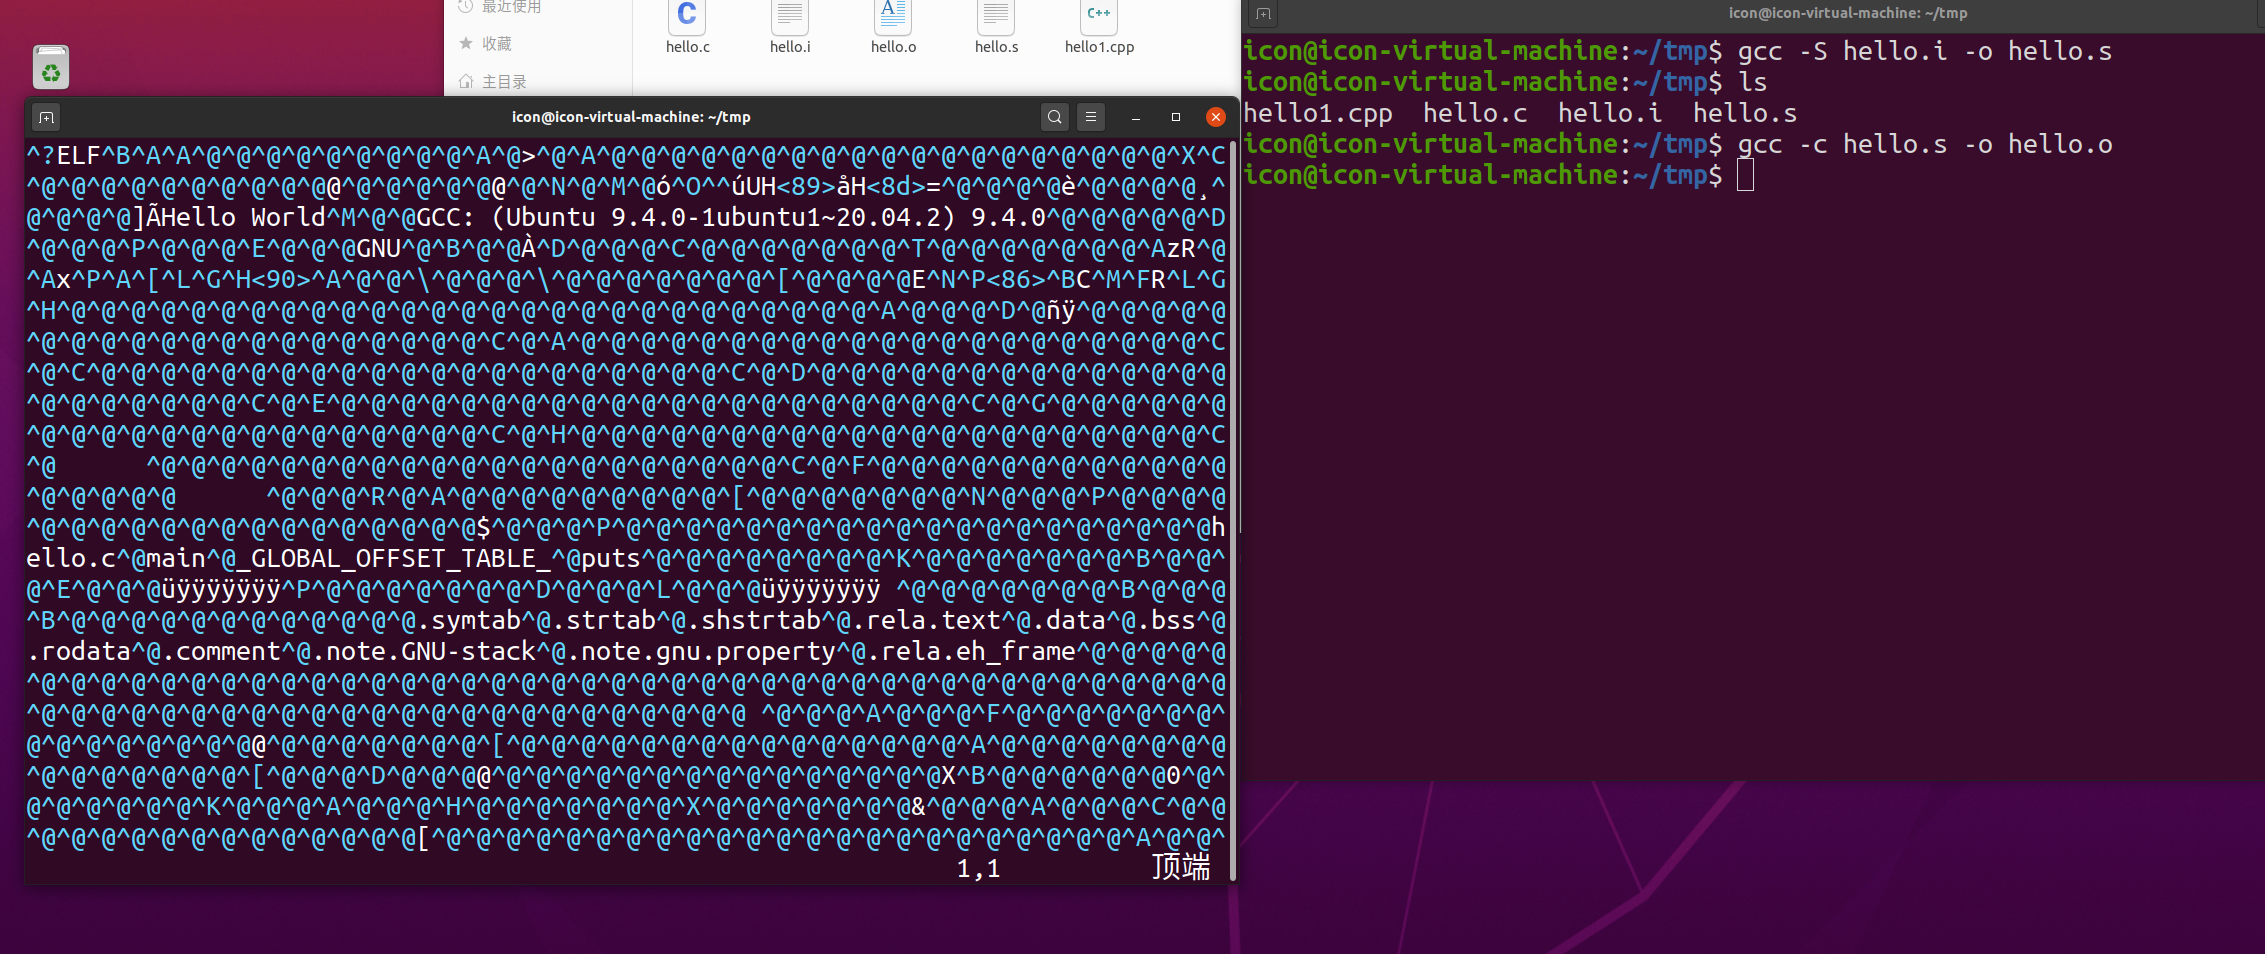
汇编gcc -c hello.s -o hello.o
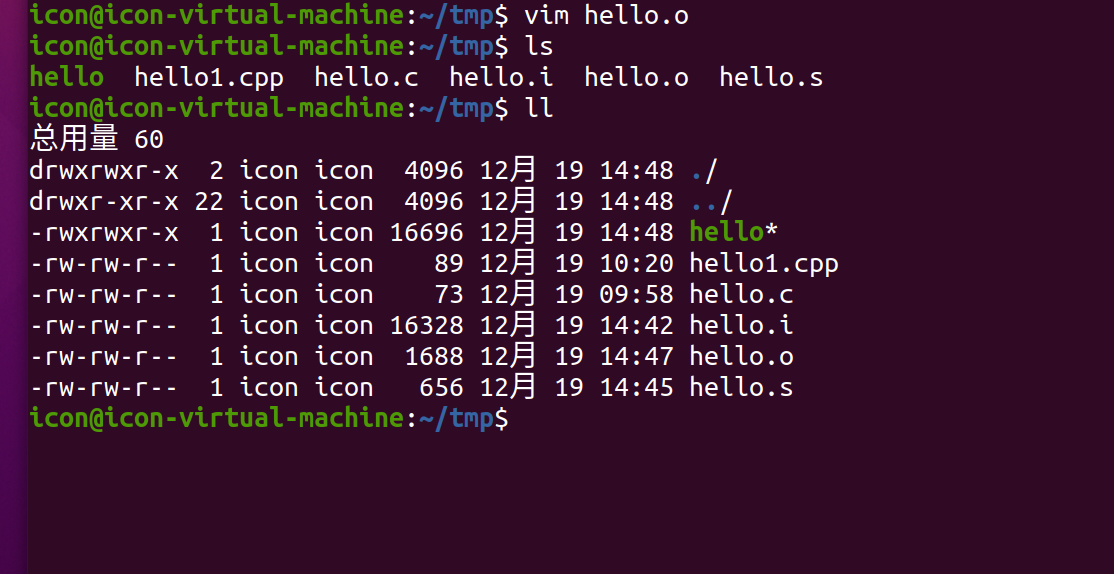
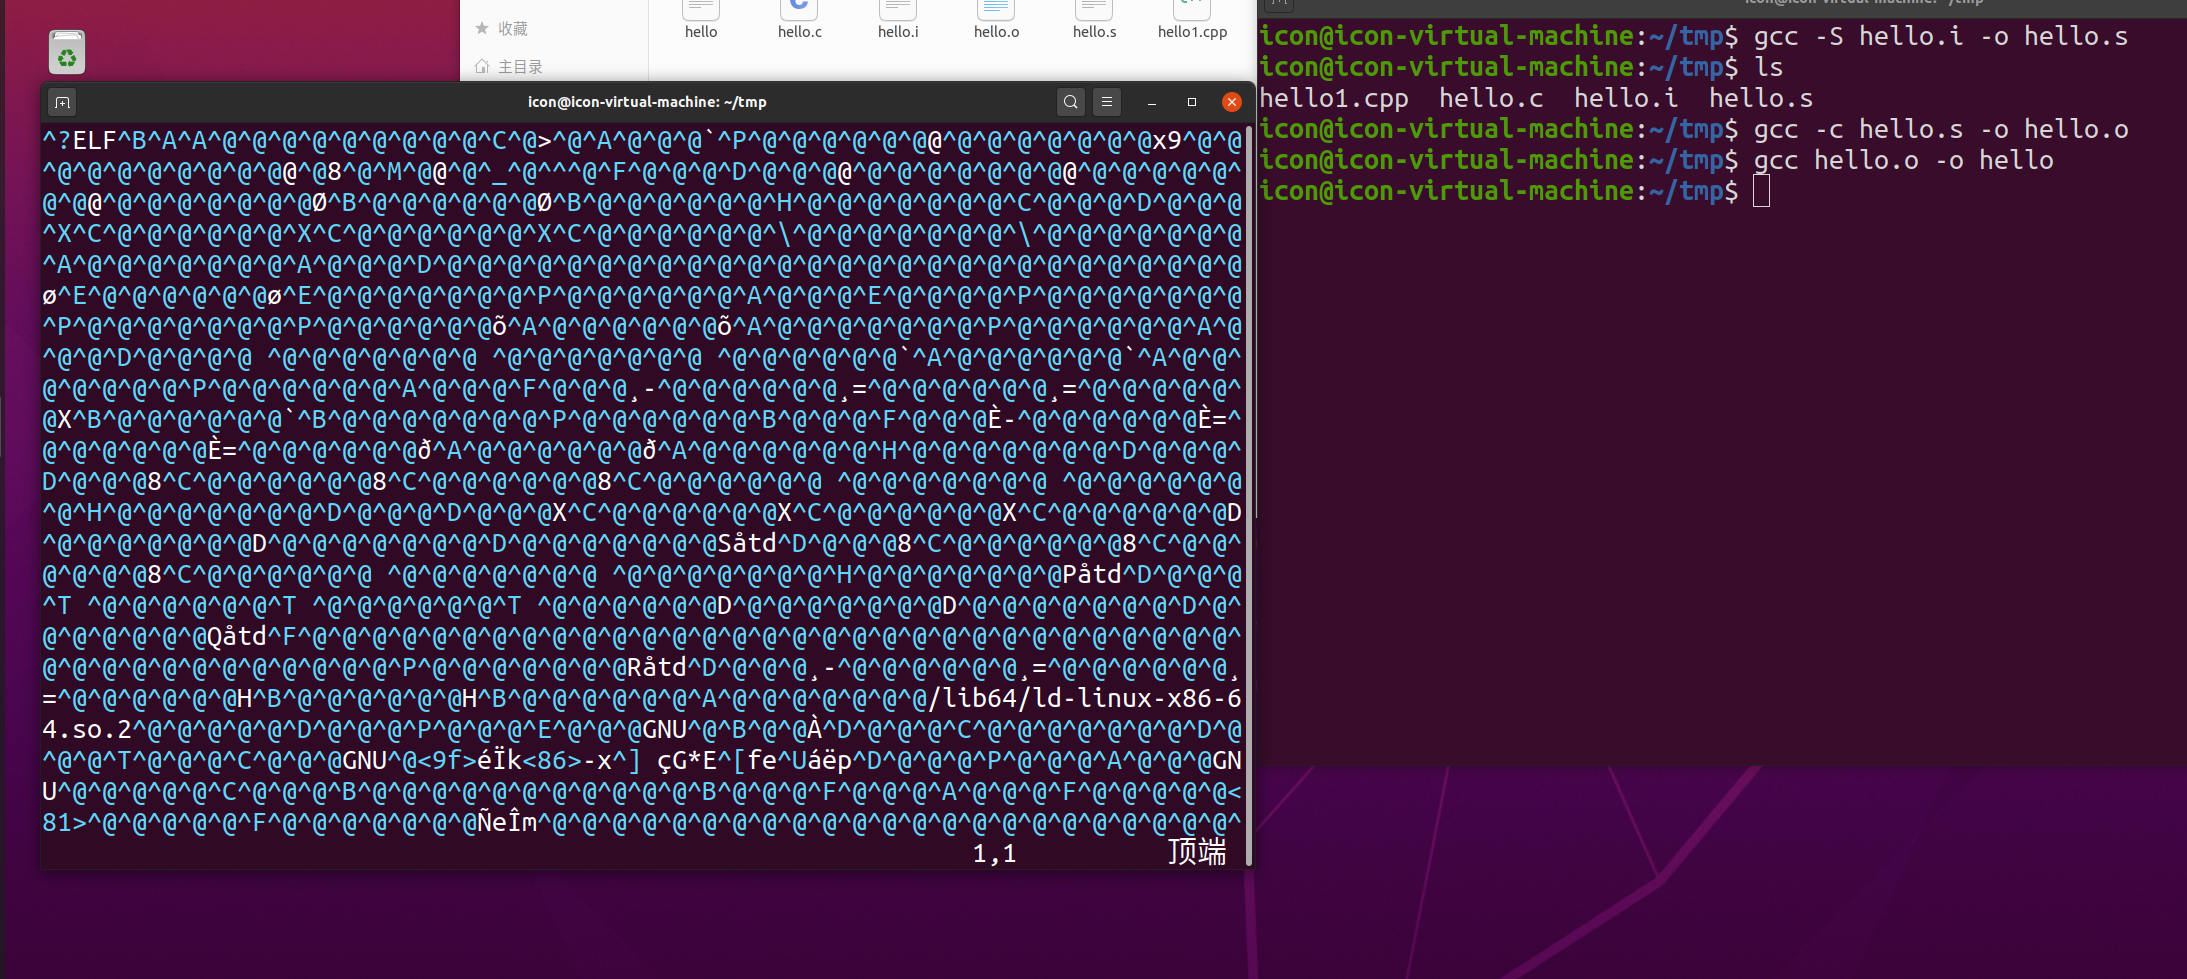
汇编之后就形成了elf文件,没有把支持库放进去现在里面是缺东西的
将一些必须库都给加载进去
进制与位 进制:
1
2
3
4
5
6
7
8
9
10
11
2进制:0 1 10 #意味着个位上能表示2个数 0 1 8进制:0 1 2 3 4 5 6 7 10 #意味着个位上能表示8个数 0 1 2 3 4 5 6 7 10进制:0 1 2 3 4 5 6 7 8 9 10 #意味着个位上能表示10个数 0 1 2 3 4 5 6 7 8 9 16进制:0 1 2 3 4 5 6 7 8 9 A B C D E F 10 #意味着个位上能表示16个数
位:
1
2
3
4
5
6
7
8
9
10
11
12
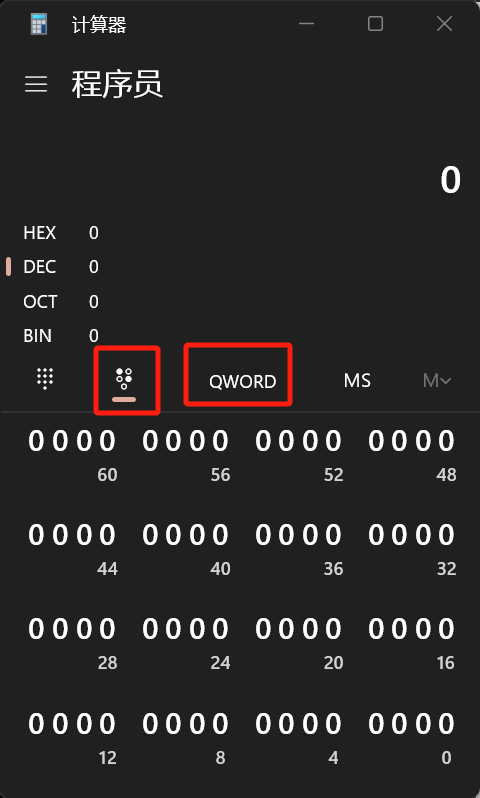
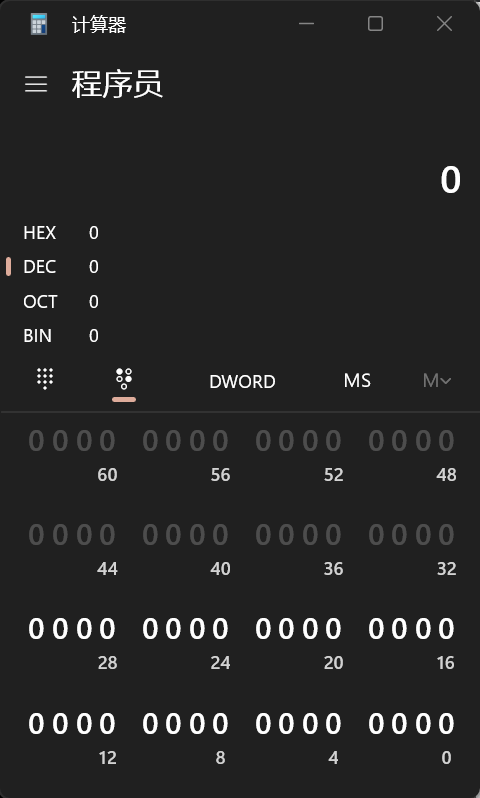
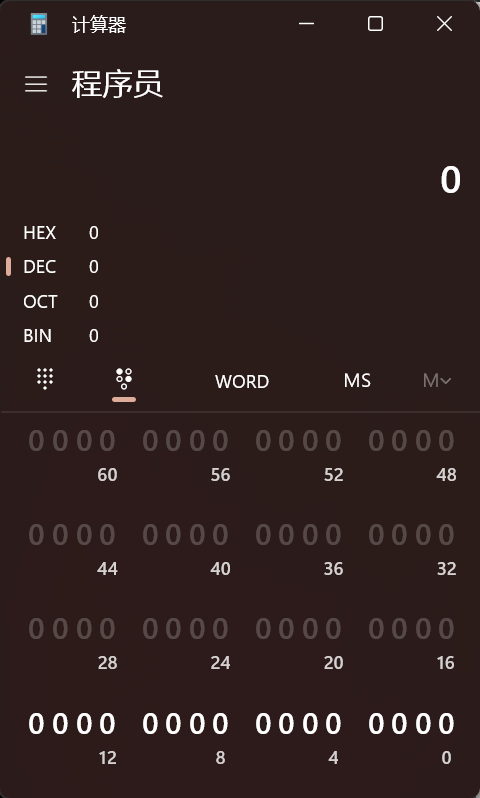
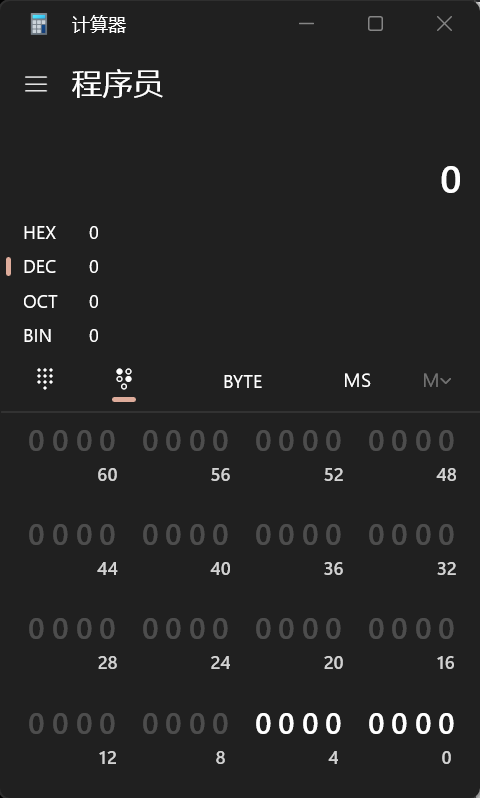
位: QWORD,DWORD,WORD,BYTE指的是数据宽度的表示 QWORD 64位 DWORD 32位 WORD 16位 BYTE 8位(1字节) 地址: 地址长度: x86 32 : 32位 0xFFFFFFFF x64 64 : 64位 0xFFFFFFFFFFFFFFFF
这是64位:
这是32位:
这是16位:
这是8位:
基础数据类型 常见数据类型 整数类型(基于MSVC) 整数类型概览
类型 宽度(字节) 无符号范围(unsigned) *有符号范围(signed)*
short
2
0 ~ 65,535
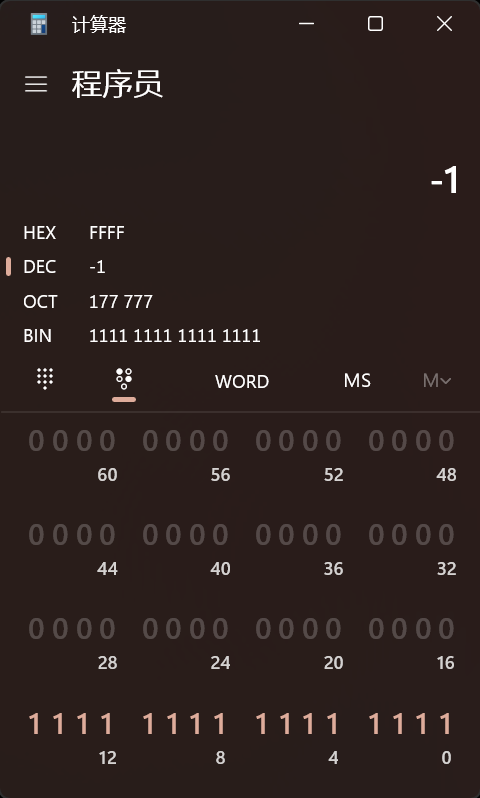
-32,768~+32,767
int
4
0 ~ 4,294,967,295
-2147483648~+2147483647
long
4
0 ~ 4,294,967,295
-2147483648~+2147483647
Long long
8
0~18446744073709551615
-9,223,372,036,854,775,808~+9,223,372,036,854,775,807
默认的都是有符号整数
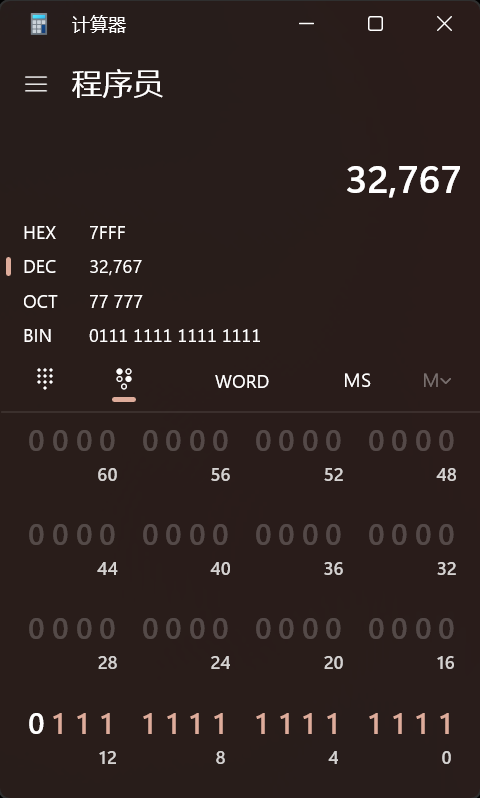
直接将首位符号位设置为0他就是正数:32767
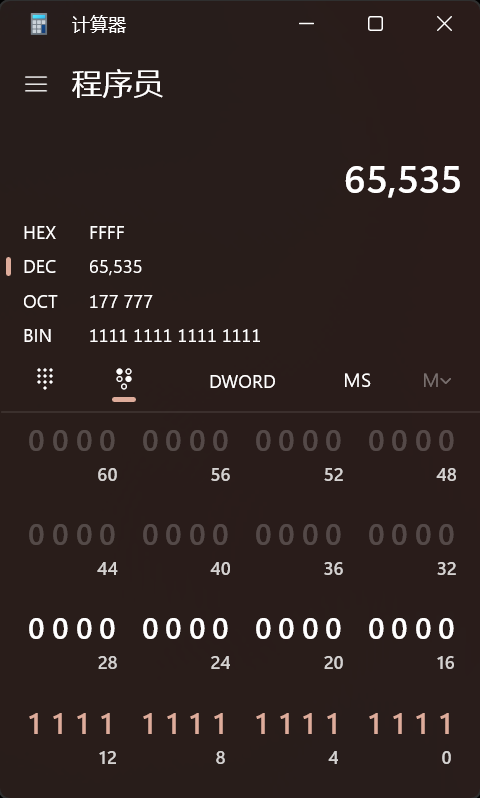
如果是32位的我们全1:他就是65535
字符类型
类型 宽度(字节) 无符号范围(unsigned) 有符号范围(signed)
char
1
0 ~ 255
-128 ~ 127
wchar_t
2
0 ~ 65,535
-32,768~+32,767
浮点数类型
类型 宽度(字节) 范围 别称
float
4
-3.4E+38 和 3.4E+38
单精度浮点数
double
8
-1.7E-308~1.7E+308
双精度浮点数
练习代码如:
main.h:
1 2 3 4 #pragma once extern int g_Number;
test.cpp:
1 2 3 4 5 6 #include "main.h" void test2 () { g_Number = 15 ; }
main.cpp:
1 2 3 4 5 6 7 8 9 10 11 12 13 14 15 16 17 18 19 20 21 22 23 24 25 26 27 28 29 30 31 32 33 34 35 36 37 38 39 40 41 42 43 44 45 46 47 48 49 50 51 52 53 54 #include <stdio.h> #include "main.h" int g_Number = 12 ;#define MAX 256 int rk () { return g_Number + 1 ; } int main () { short sNumberA = 0 ; sNumberA = 0xFFFF ; short sNumberB = 2 ; short sNumber = sNumberA + sNumberB; printf ("\t%hd+%hd=%hd\r\n" , sNumberA, sNumberB,sNumber); int nNumber = 12138 ; long lNumber = 123456 ; long long llNumber = 123456789 ; unsigned int unNumber = 158 ; printf ("\t%d,%d,%lld\r\n" , nNumber, lNumber, llNumber); float fNumber = 12.5f ; double dbNumber = 12.5 ; printf ("\t%f-\"%f\r\n" , fNumber, dbNumber); int a = 0x12345678 ; int nNum = MAX; int rk = 12138 ; nNum = rk; char cStr = '1' ; wchar_t wcStr = 'a' ; printf ("%c" , wcStr); return 0 ; }
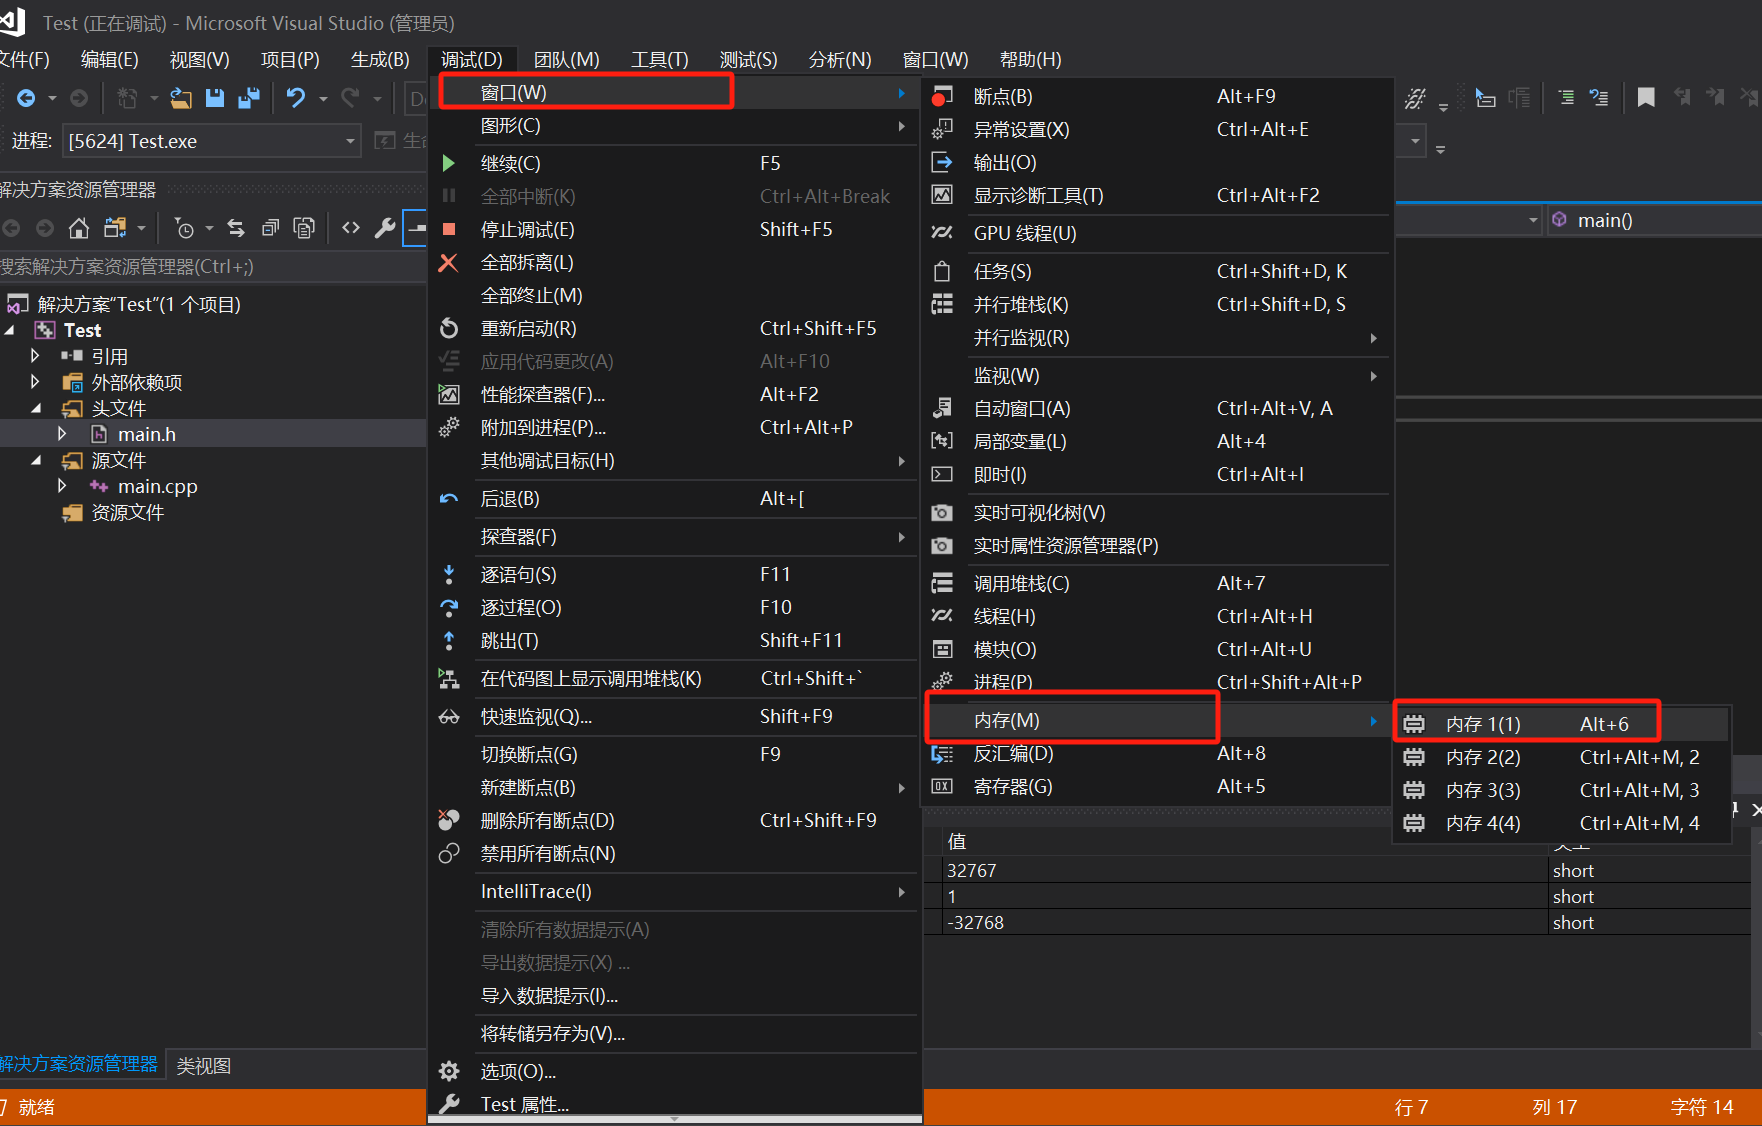
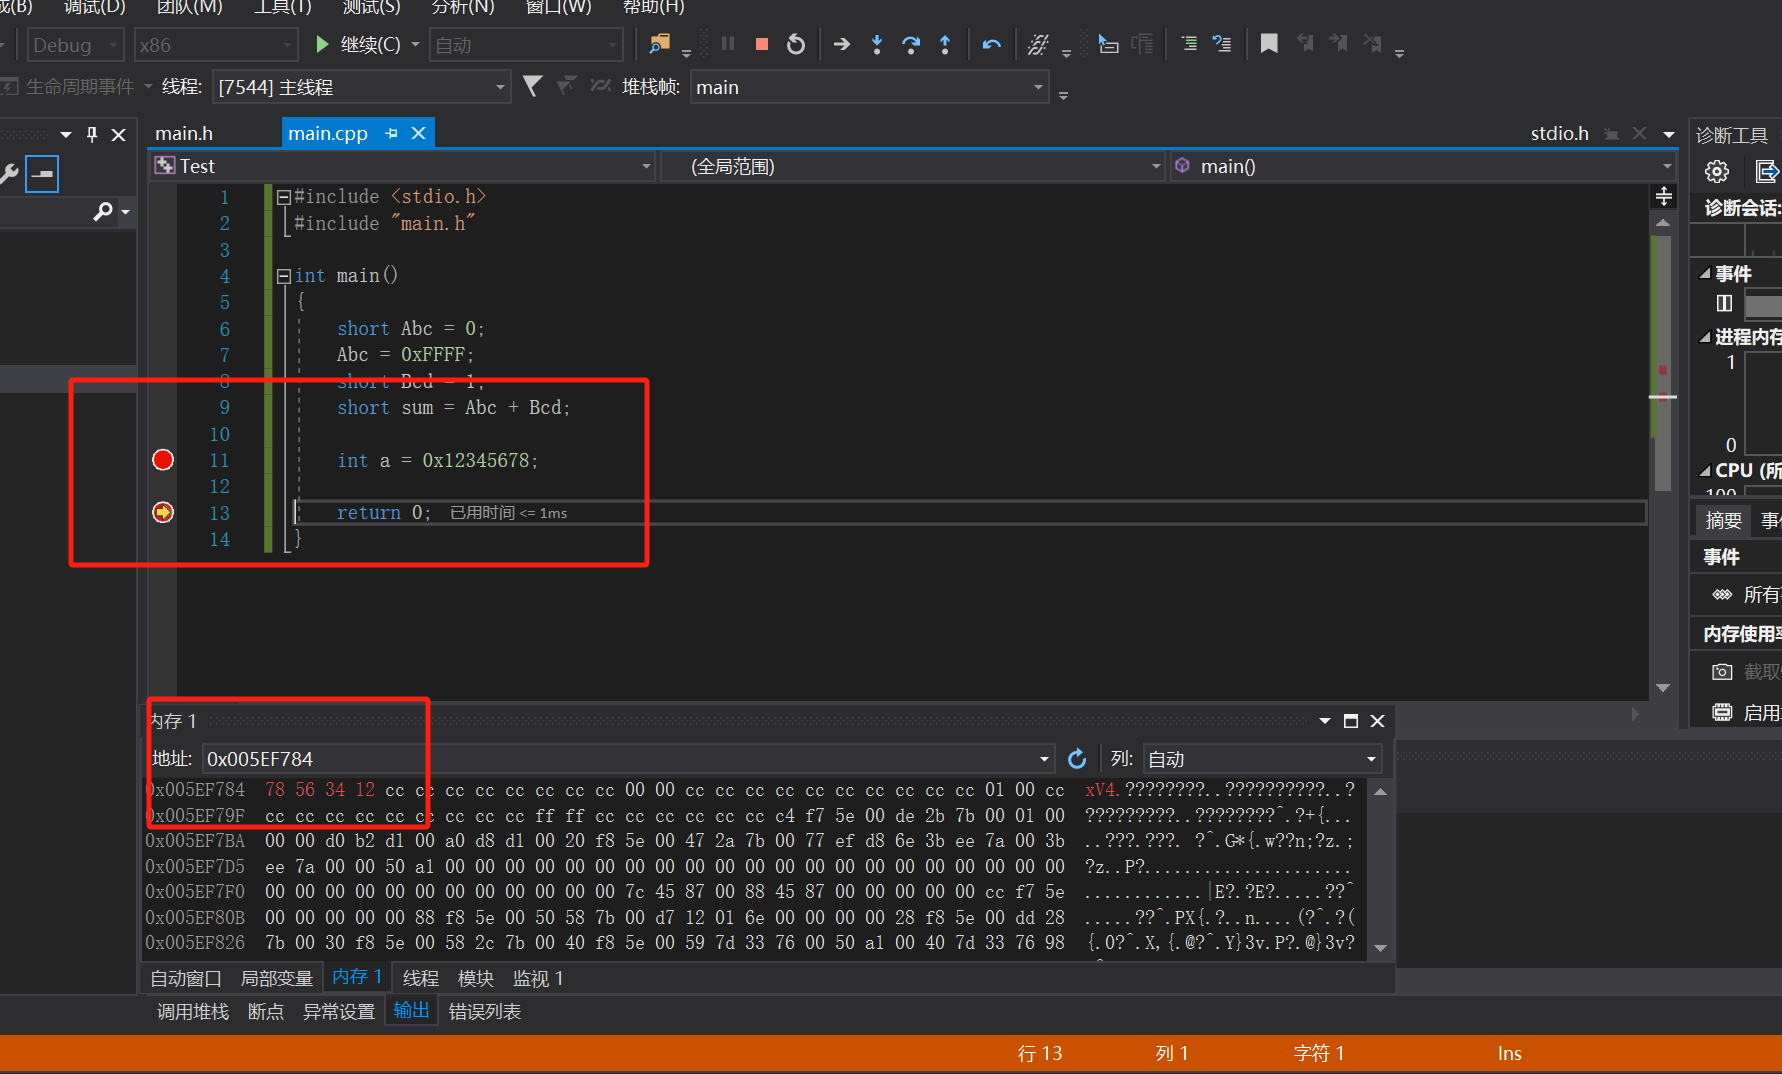
内存查看:(调试) 调试——>窗口——>内存——>内存1
直接&Abc利用取地址符
接下来分析一下这段代码内容:
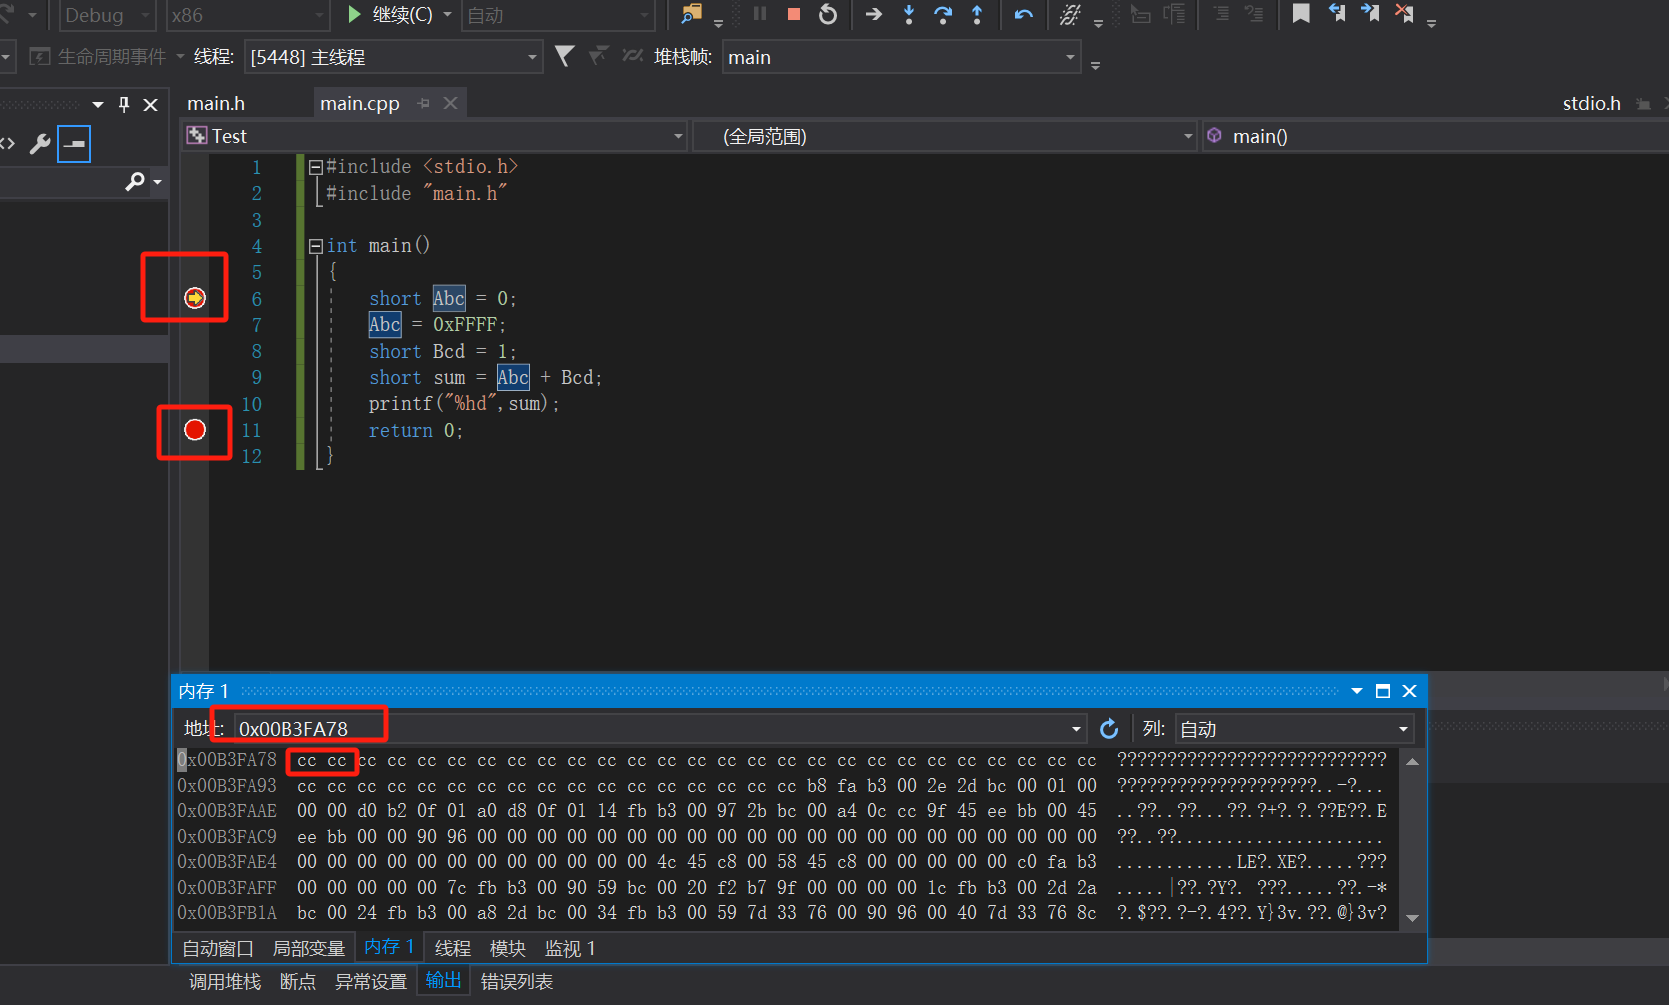
首先打两个断点:然后运行这个项目:
在上面这一步中&Abc其还是一个cc cc的未初始化的一个值。
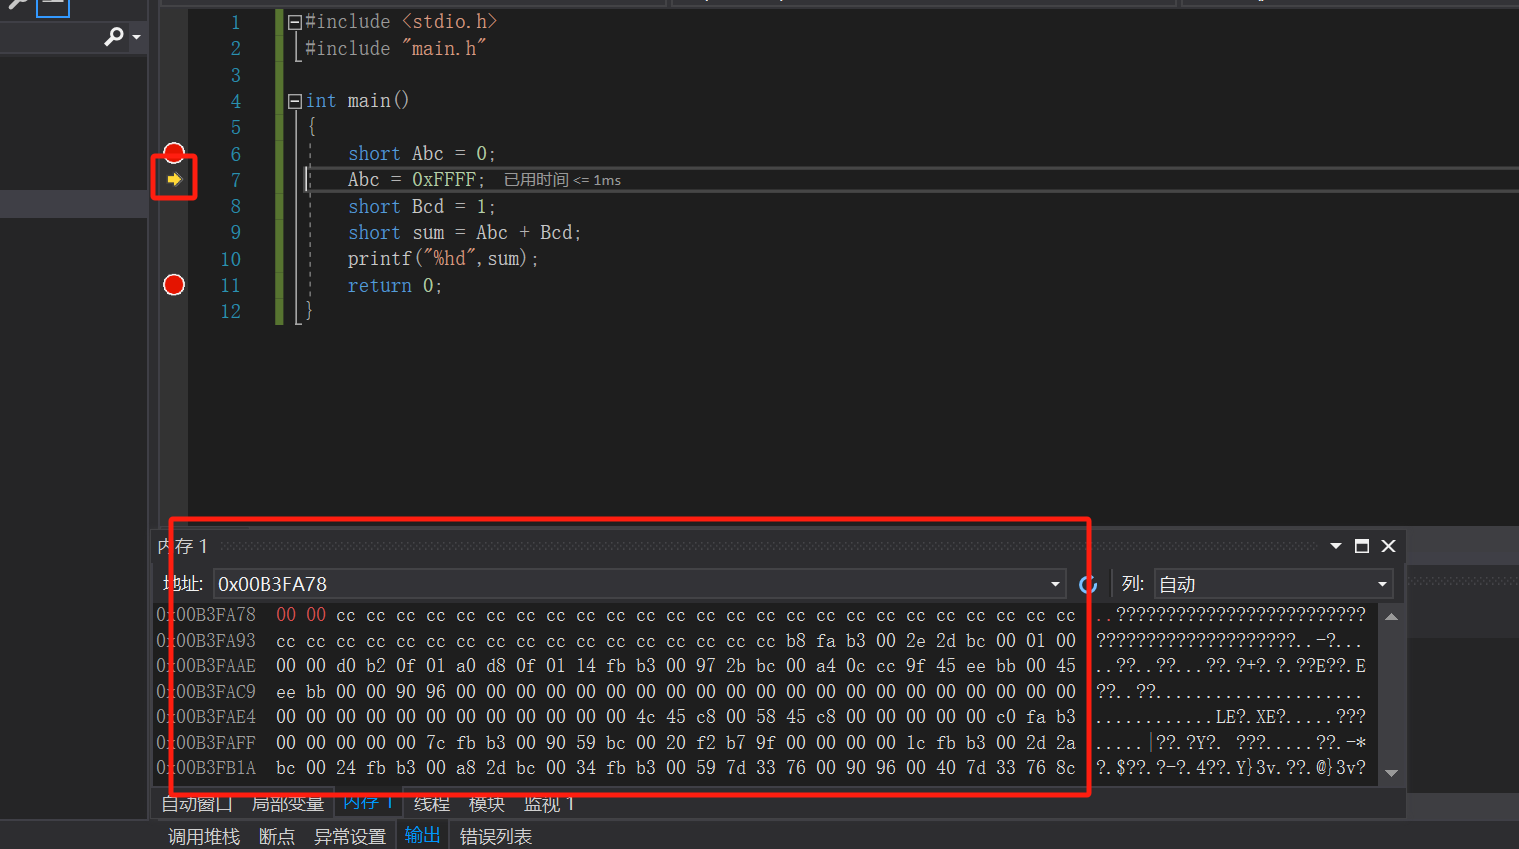
F10让其运行到下一步:
这个 红色的00 00就是他所占的一个内存空间
0x00B3FA78是他的内存地址
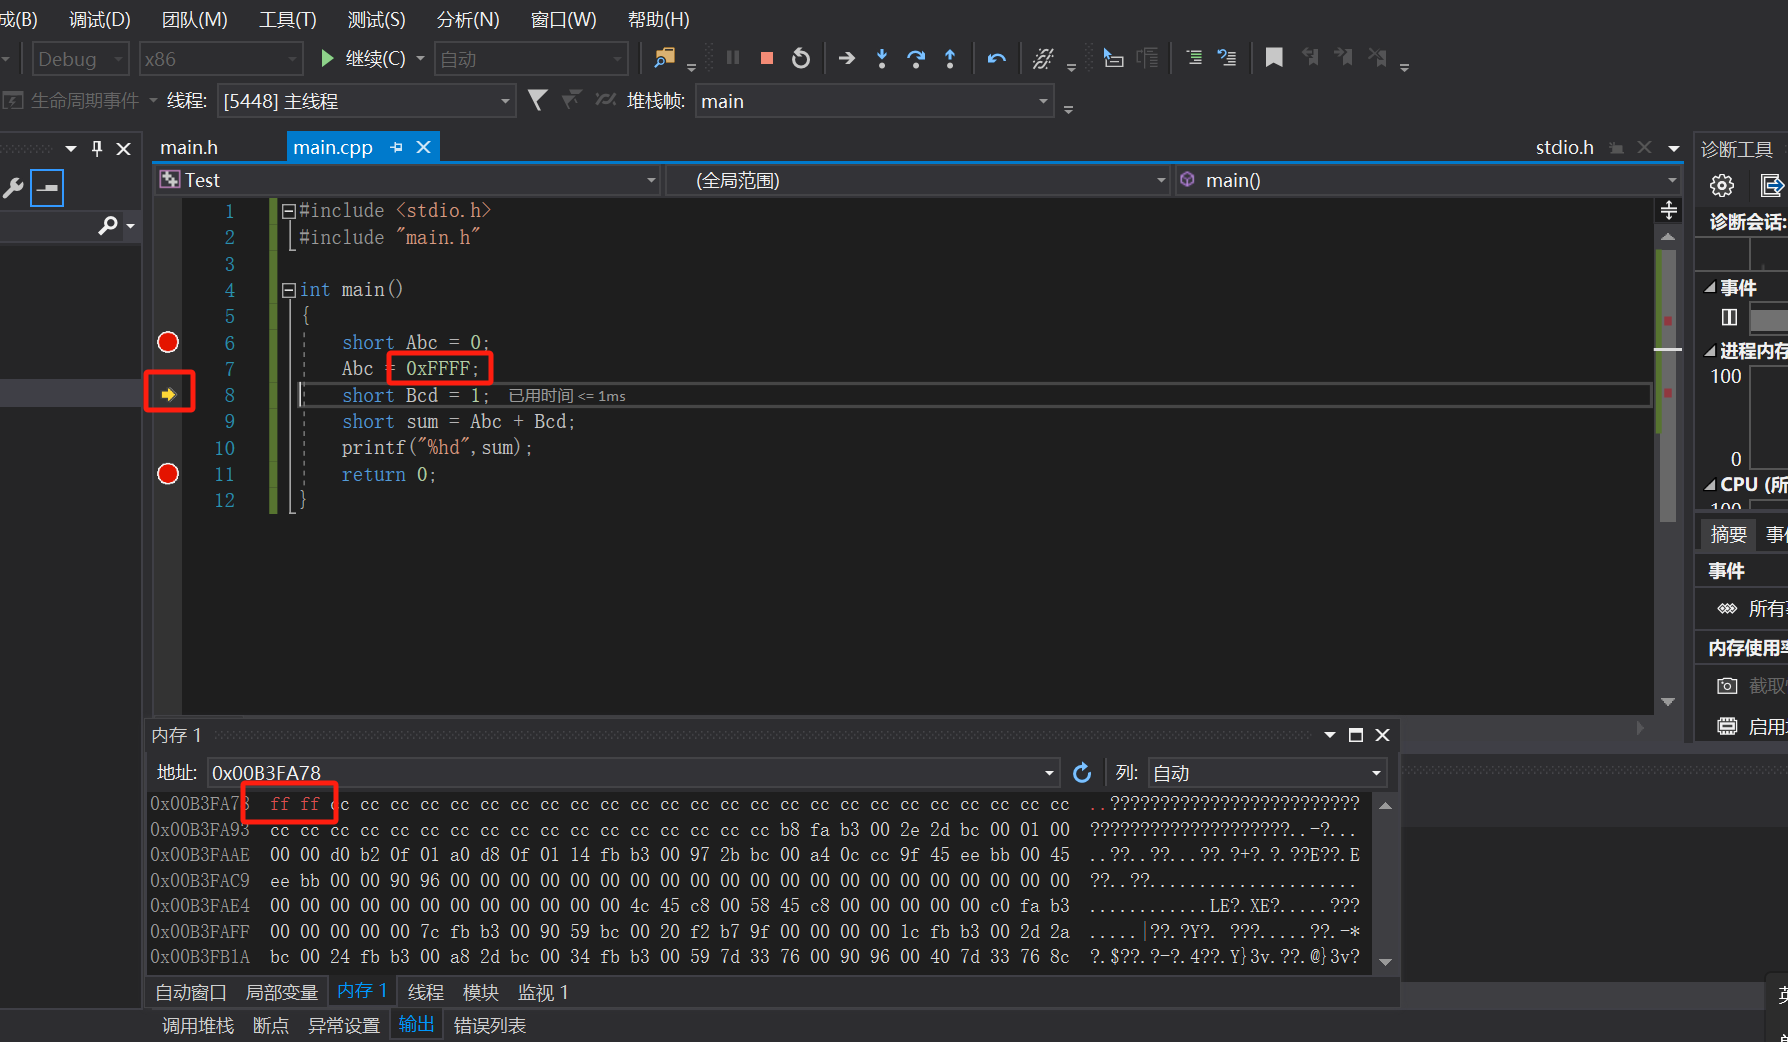
继续下一步:
这就是我们给他赋的值FFFF.
大端序和小端序: 一般情况下默认内存存储为小端序
如下图我所打断点所示:
算术运算符号 练习代码:
main.cpp:
1 2 3 4 5 6 7 8 9 10 11 12 13 14 15 16 17 18 19 20 21 22 23 24 25 26 27 28 29 30 31 32 33 34 35 36 37 38 39 40 41 42 43 44 45 46 47 48 49 #include <stdio.h> #include <stdlib.h> int main () int nNunber = 10 ; bool bFlag = 1 != 2 ; system ("pause" ); return 0 ; }
位运算和逻辑运算 位运算——>main.cpp:
1 2 3 4 5 6 7 8 9 10 11 12 13 14 15 16 17 18 19 20 21 22 23 24 25 26 27 28 29 30 31 32 33 34 35 36 37 38 39 40 41 #include <stdio.h> #include <stdlib.h> int main () system ("pause" ); return 0 ; }
注意:
右移略微复杂:整体右移没有问题,但其不是高位补0,而是高位是1就全补1,高位是0就全补0
逻辑运算——>main.cpp:
1 2 3 4 5 6 7 8 9 10 11 12 13 14 15 16 17 18 19 #include <stdio.h> #include <stdlib.h> int main () int bRes = 10 > 20 ? 1 : 2 ; system ("pause" ); return 0 ; }
选择结构 main.cpp:
1 2 3 4 5 6 7 8 9 10 11 12 13 14 15 16 17 18 19 20 21 22 23 24 25 26 27 28 29 30 31 32 33 34 35 36 37 38 39 40 41 42 43 44 45 46 47 48 49 #include <stdio.h> #include <stdlib.h> int main () { Lab1: int nFlag = 1 ; goto Lab1; nFlag = 5 ; printf ("%d\r\n" , nFlag); system("pause" ); return 0 ; }
循环结构 main.cpp:
1 2 3 4 5 6 7 8 9 10 11 12 13 14 15 16 17 18 19 20 21 22 23 24 25 26 27 28 29 30 31 32 33 34 35 36 37 38 #include <stdio.h> #include <stdlib.h> int main () { system("pause" ); return 0 ; }
数组与字符串 main.cpp:
1 2 3 4 5 6 7 8 9 10 11 12 13 14 15 16 17 18 19 20 21 22 23 24 25 26 27 28 29 30 31 32 33 34 35 36 37 38 39 40 41 #include <stdio.h> #include <stdlib.h> int main () { char szStr[] = "rkvir" ; char szStr2[] = { 'r' ,'k' ,'v' ,'i' ,'r' ,0 }; wchar_t wszStr[] = L"rkvir" ; printf ("%s\r\n" , szStr); printf ("%S\r\n" , wszStr); system("pause" ); return 0 ; }
指针和内存管理 main.cpp:
1 2 3 4 5 6 7 8 9 10 11 12 13 14 15 16 17 18 19 20 21 22 23 24 25 26 27 28 29 30 31 32 33 34 35 36 37 38 39 40 41 42 43 44 45 46 47 48 49 50 51 52 53 54 55 56 57 58 59 60 61 62 63 64 65 #include <stdio.h> #include <stdlib.h> #include <memory.h> int main () { char * szBuffer = (char *)"rkvir" ; system("pause" ); return 0 ; }
内存:
变量存在地址 和值 这个东西
字符串操作函数 main.cpp:
1 2 3 4 5 6 7 8 9 10 11 12 13 14 15 16 17 18 19 20 21 22 23 24 25 26 27 28 29 30 31 32 33 34 35 36 37 38 39 40 41 42 43 44 45 46 47 #include <stdio.h> #include <stdlib.h> #include <memory.h> #include <string.h> int main () { char * szStr = (char *)"rkvir" ; printf ("String Length:%d\r\n" , strlen (szStr)); char * szSubStr = (char *)"vi1" ; if (strstr (szStr, szSubStr)) { printf ("包含\r\n" ); } else { printf ("不包含\r\n" ); } char szCatStr[50 ] = { 0 }; strcpy (szCatStr, "Hello" ); printf ("%s\r\n" , szCatStr); strcat (szCatStr, " World!" ); printf ("%s\r\n" , szCatStr); if (strcmp (szStr,"rkvir2" ) == 0 ) { printf ("相同\r\n" ); } else { printf ("不同\r\n" ); } char * szNum = (char *)"100" ; int nNum = atoi(szNum); printf ("%d\r\n" , nNum); wchar_t wcsStr[] = L"rkvir" ; printf ("%d\r\n" , wcslen(wcsStr)); system("pause" ); return 0 ; }
函数与递归 main.cpp:
1 2 3 4 5 6 7 8 9 10 11 12 13 14 15 16 17 18 19 20 21 22 23 24 25 26 27 28 29 30 31 32 33 34 35 36 37 38 39 40 41 42 43 44 45 46 47 48 49 50 51 52 53 54 55 56 57 58 59 60 61 62 63 64 65 66 67 68 69 70 71 72 73 74 75 76 77 78 79 #include <stdio.h> #include <stdlib.h> #include <memory.h> #include <string.h> void test1 (const char * szBuffer) { printf ("%s\r\n" , szBuffer); } void test2 (const int * nNumArr,int nSize) { for (size_t i = 0 ; i < nSize; i++) { printf ("%d\r\n" , nNumArr[i]); } } char * test3 () { return (char *)"rkvir" ; } void test4 (int *nRes) { *nRes = 100 ; } typedef void (*fntest5) (int *) ;int test6 (int nValue, int *nCount) { if (nValue <= 100 ) { *nCount += nValue; test6(++nValue, nCount); } return *nCount; } int main () { test1("rkvir" ); int nNumArr[] = { 1 ,2 ,3 ,4 ,5 ,6 ,7 ,8 ,9 }; test2(nNumArr, 9 ); printf ("%s\r\n" , test3()); int nRes = 0 ; test4(&nRes); printf ("%d\r\n" ,nRes ); fntest5 funtest5 = (fntest5)test4; funtest5(&nRes); printf ("%d\r\n" , nRes); int nRet = 0 ; test6(0 , &nRet); printf ("%d\r\n" , nRet); system("pause" ); return 0 ; }
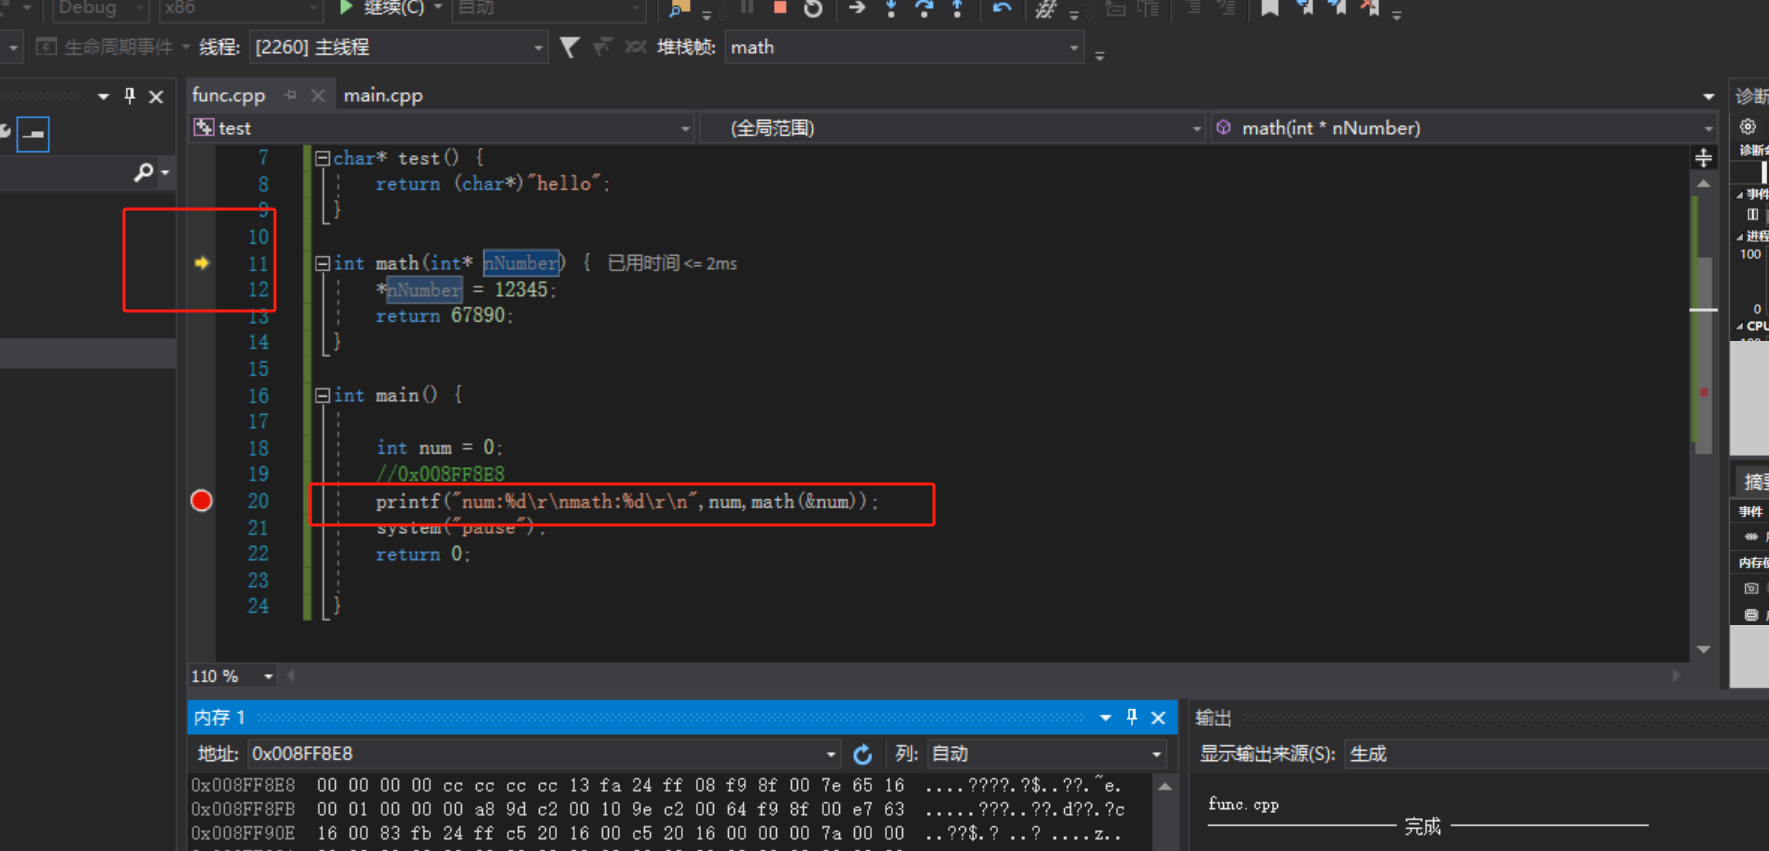
F11快捷键跟进函数内部
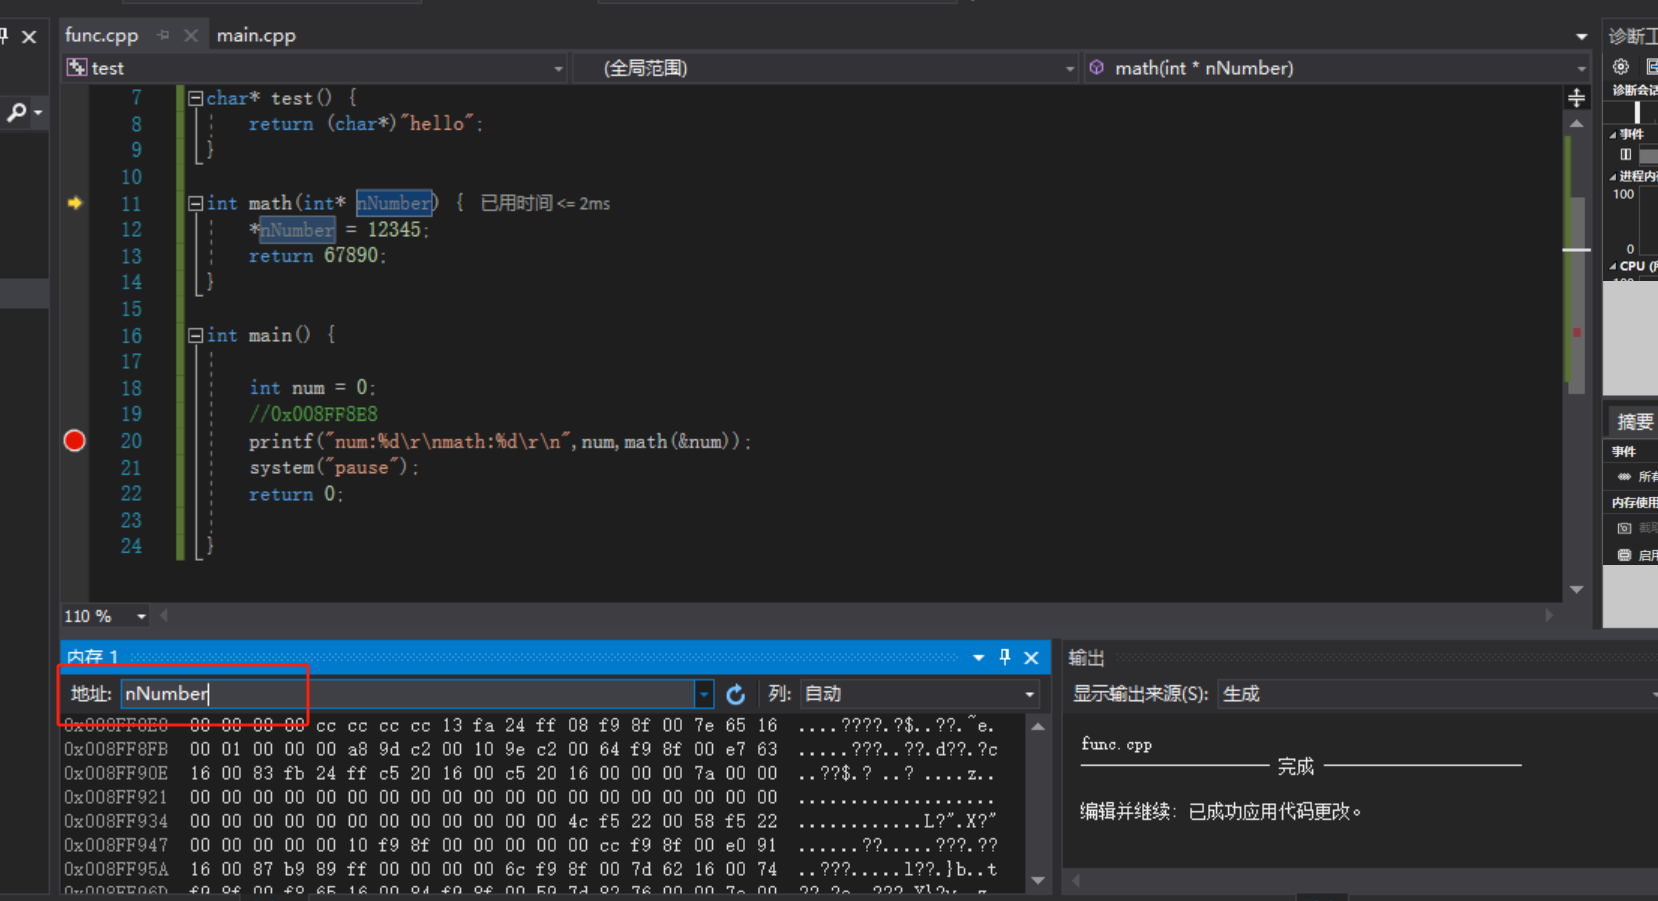
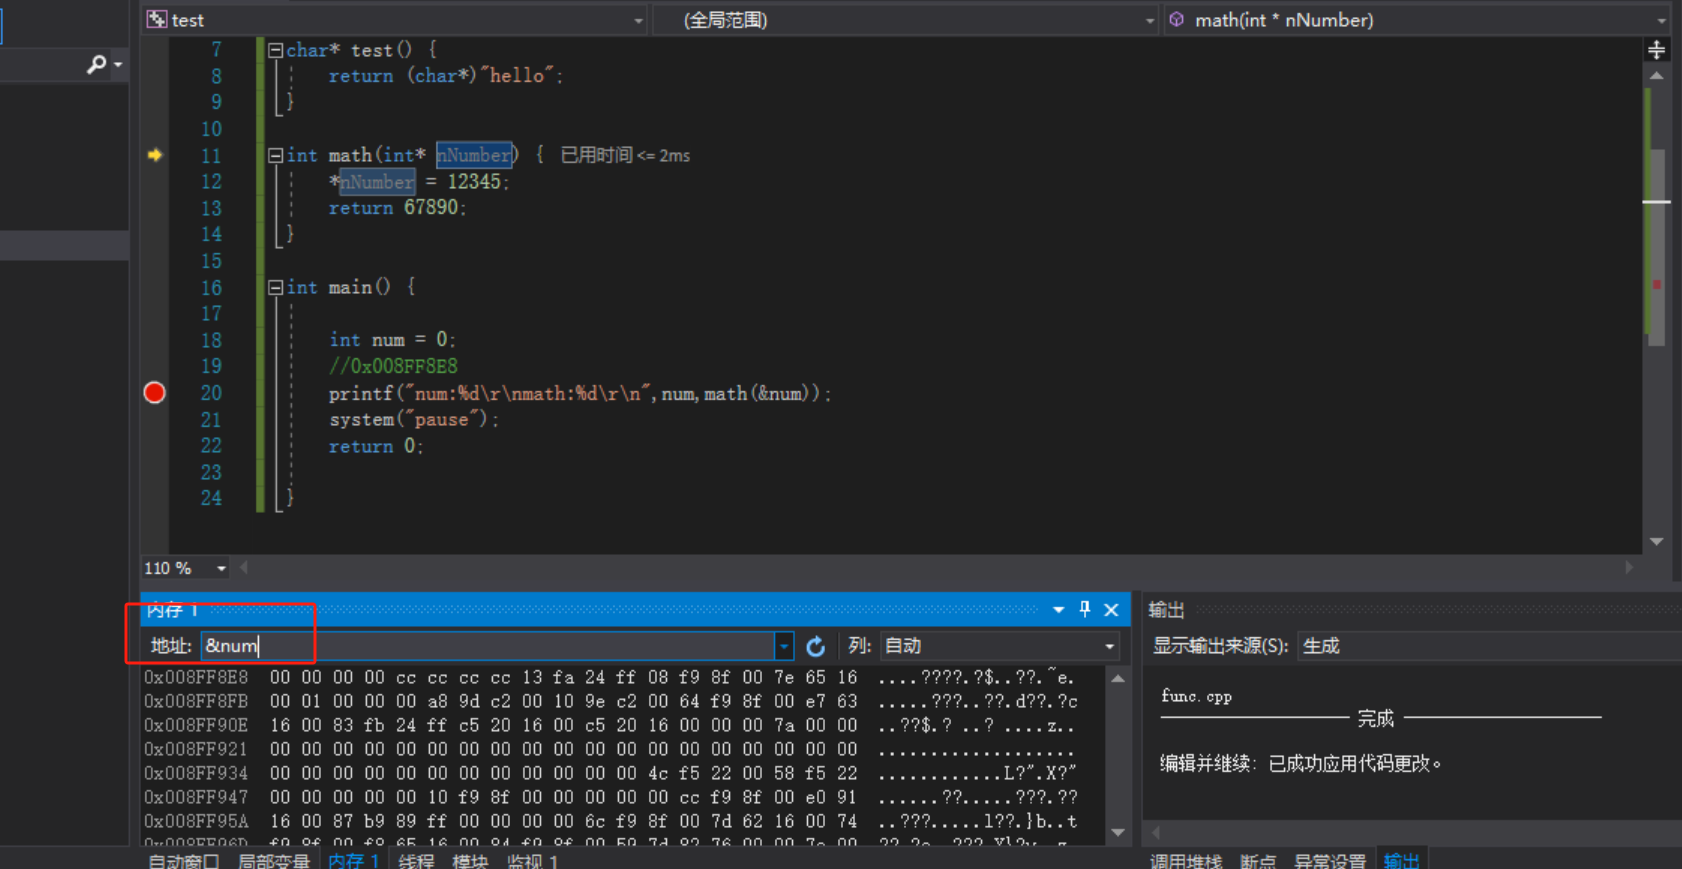
想要在下方查看其指针指向的地址的内容就直接,指针名 回车即可:
这个就是其nNumber这个变量存储的地址:
0x008FF8E8
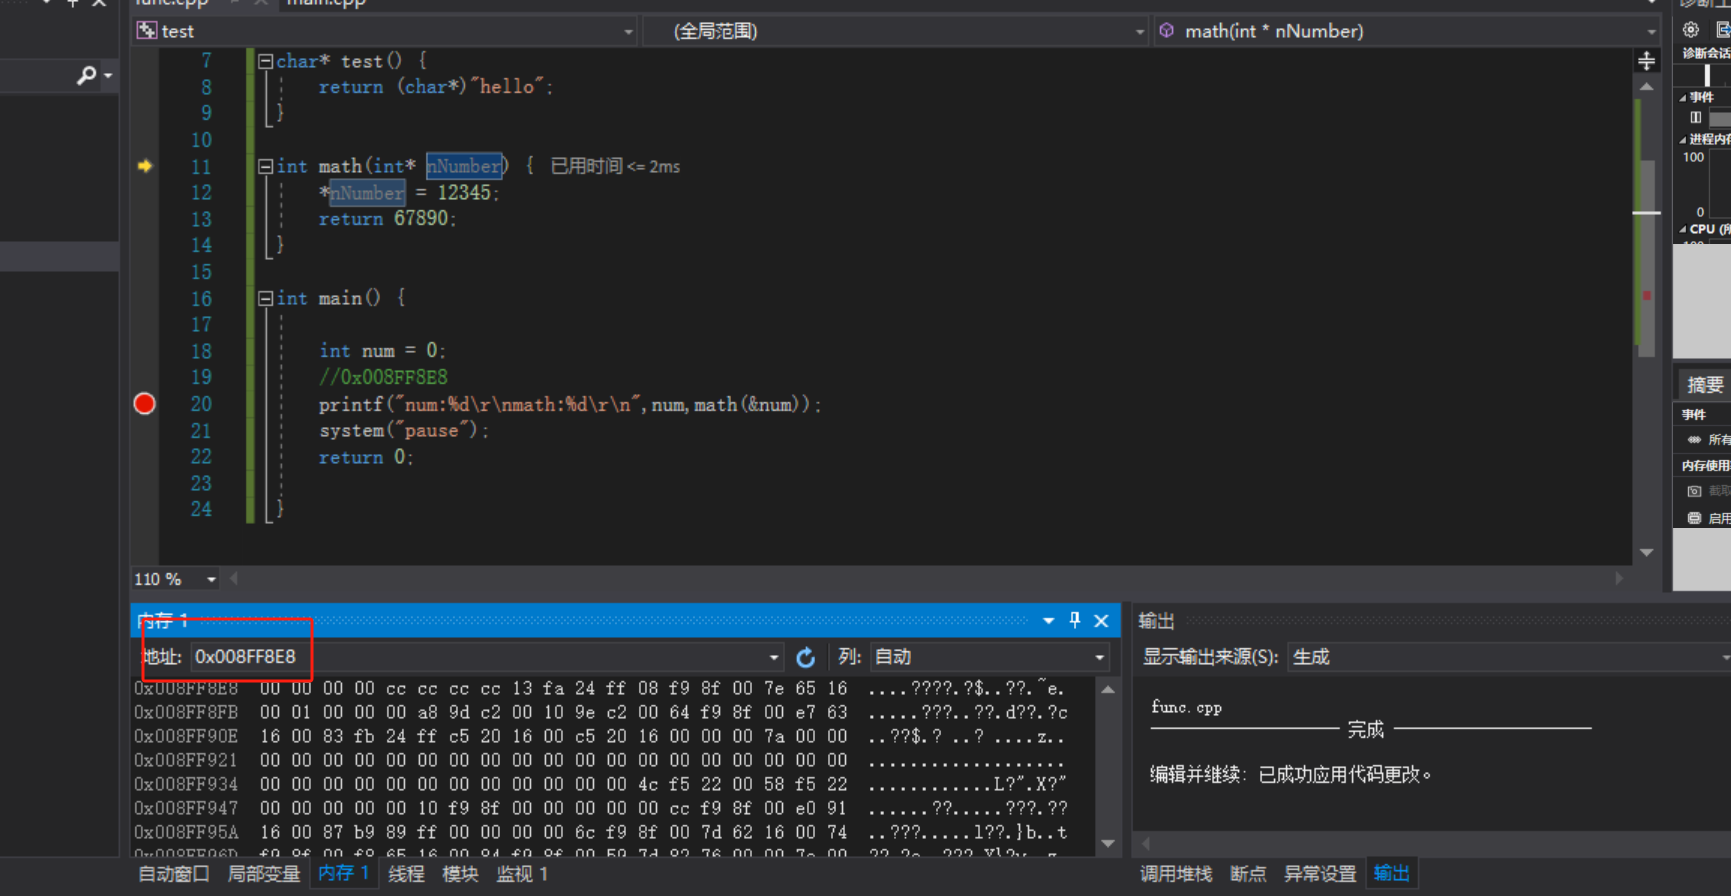
我们看看外部变量num的对应的地址是:
&num回车即可:
其对应的地址也是0x008FF8E8这也就是直接传入地址,然后函数内部直接对地址对应的值就可以进行操作了。
如何使用函数指针? 首先了解一下typedef:
其是用来定义类型别名的关键字
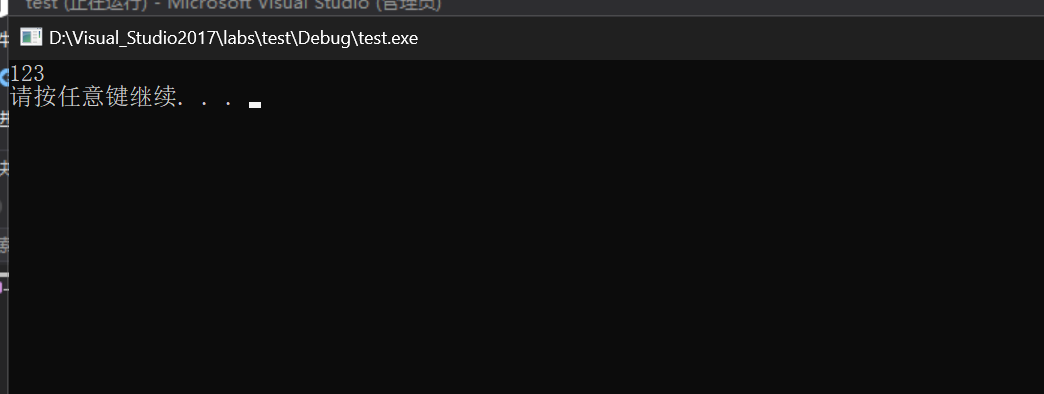
1 2 3 4 5 6 7 8 9 10 typedef int rkvir;int main () { rkvir a = 123 ; printf ("%d\r\n" , a); system("pause" ); return 0 ; }
函数指针:
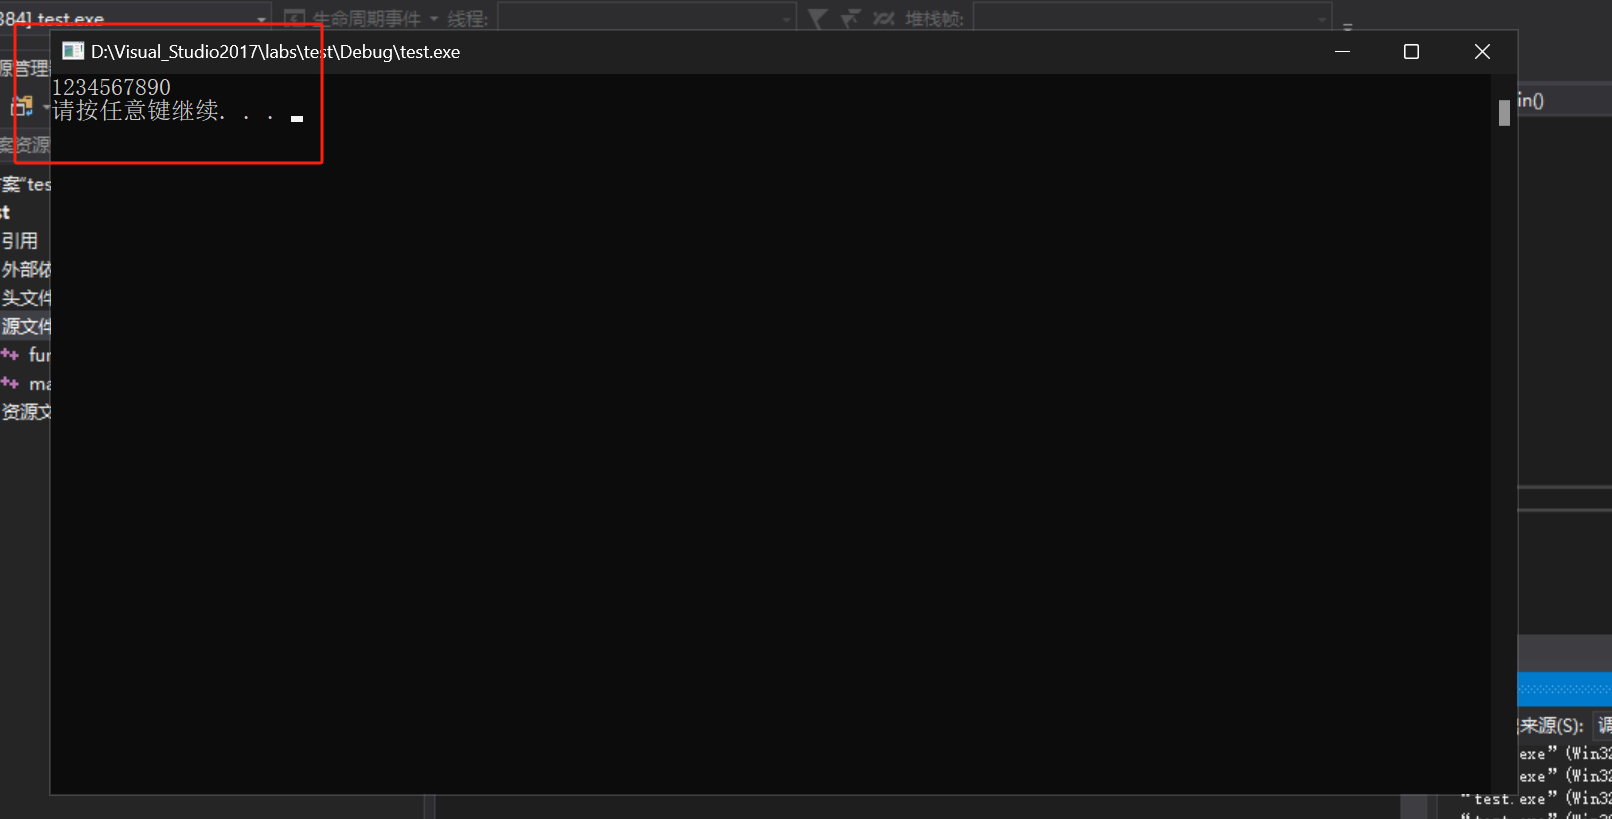
1 2 3 4 5 6 7 8 9 10 11 12 13 14 15 16 17 18 19 20 21 22 23 24 25 26 27 28 29 30 typedef int (* _math1) (int ) ;int math (int num) { return num; } int main () { _math1 fn = math; int nRes = fn(1234567890 ); printf ("%d\r\n" , nRes); system("pause" ); return 0 ; }
typedef int (* _math1)(int);
这段代码定义了一个函数指针类型 _math1,它指向一个接受 int 类型参数并返回 int 类型结果的函数。
typedef 是用来定义类型别名的关键字int(* _math1)(int) 表示 _math1 是一个指向函数的指针 ,这个函数接收一个 int 类型的参数,并返回 int 类型的结果。
解释:
_math1 是一个指向函数的指针这个函数必须接受一个 int 类型的参数
函数的返回值是 int 类型
输入输出函数 main.cpp:
1 2 3 4 5 6 7 8 9 10 11 12 13 14 15 16 17 18 19 20 21 22 23 24 25 26 27 28 29 30 31 32 33 #include <stdio.h> #include <stdlib.h> #include <memory.h> #include <string.h> int main () { int nNumber = 0 ; char * szBuffer = new char [256 ]{ 0 }; system("pause" ); return 0 ; }
结构体联合体与枚举 main.cpp:
1 2 3 4 5 6 7 8 9 10 11 12 13 14 15 16 17 18 19 20 21 22 23 24 25 26 27 28 29 30 31 32 33 34 35 36 37 38 39 40 41 42 43 44 45 46 47 48 49 50 51 52 #include <stdio.h> #include <stdlib.h> #include <memory.h> #include <string.h> typedef struct _SINFO { char szName[50 ]; int nAge; }SINFO,*PSINFO; typedef union _UINFO { char szName[50 ]; int nAge; }UINFO,*PUINFO; enum { One, Two, Three, Magic = 8 , Ten = 10 }; int main () { SINFO sObj; strcpy (sObj.szName, "rkvir" ); sObj.nAge = 18 ; printf ("SINFO:%s-%d\r\n" , sObj.szName, sObj.nAge); UINFO uObj; strcpy (uObj.szName, "rkvir" ); uObj.nAge = 18 ; printf ("UINFO:%s-%d\r\n" , uObj.szName, uObj.nAge); printf ("One:%d-Magic:%d-Ten%d\r\n" , One, Magic, Ten); system("pause" ); return 0 ; }
联合体和结构体的区别: 结构体的大小是所有变量的总和,所以说他是每一个变量都有自己独立的空间
联合体取得是最大变量的那个体积,其他变量都共有它
有参宏与无参宏 main.cpp:
1 2 3 4 5 6 7 8 9 10 11 12 13 14 15 16 17 18 19 20 21 22 23 24 25 26 27 28 29 30 31 32 33 34 35 36 37 38 39 40 41 42 43 44 45 46 47 48 49 50 #include <stdio.h> #include <stdlib.h> #include <memory.h> #include <string.h> #define NUM 256 #define ADD(a,b) a + b; #define MAX(a,b) a > b ? a:b #define FLAG 5 #if FLAG == 1 int g_Flag = 1 ;#elif FLAG == 2 int g_Flag = 2 ;#else int g_Flag = 3 ;#endif #if _WIN32 int g_OS = 0 ;#elif __linux__ int g_OS = 1 ;#endif int main () { printf ("%d\r\n" , NUM); int nRes = ADD(NUM, 1 ); printf ("%d\r\n" , nRes); nRes = MAX(10 , 5 ); printf ("%d\r\n" , nRes); if (g_OS == 0 ) { printf ("Windows\r\n" ); } else { printf ("Linux\r\n" ); } printf ("Flag:%d\r\n" , g_Flag); system("pause" ); return 0 ; }
文件操作 main.cpp:
1 2 3 4 5 6 7 8 9 10 11 12 13 14 15 16 17 18 19 20 21 22 23 24 25 26 27 28 29 30 31 32 33 34 35 36 37 38 39 40 41 42 43 44 45 46 47 48 49 50 51 52 53 54 55 56 57 58 59 60 61 62 63 64 65 66 67 68 69 #include <stdio.h> #include <stdlib.h> #include <memory.h> #include <string.h> char * ReadFile (char * szFilePath) { FILE * pFile; int nReadFileSize = 0 ; if ((pFile = fopen(szFilePath, "r" )) == NULL ) { printf ("open file failed!\n" ); fclose(pFile); exit (0 ); } fseek(pFile, 0 , SEEK_END); nReadFileSize = ftell(pFile); rewind(pFile); char * szReadBuffer = new char [nReadFileSize + 1 ]; if (szReadBuffer == NULL ) { printf ("malloc memory failed!\n" ); fclose(pFile); exit (0 ); } memset (szReadBuffer, 0 , (nReadFileSize + 1 )); int nReadRetSize = 0 ; nReadRetSize = fread(szReadBuffer, 1 , nReadFileSize, pFile); if (nReadRetSize != nReadFileSize) { printf ("Read File failed!\n" ); fclose(pFile); exit (0 ); } fclose(pFile); return szReadBuffer; } int WriteFile (char * szFilePath, char * szBuffer) { FILE * pFile; if ((pFile = fopen(szFilePath, "w" )) == NULL ) { printf ("open file failed!\n" ); fclose(pFile); exit (0 ); } int nRet = fwrite(szBuffer, strlen (szBuffer), 1 , pFile); fclose(pFile); return nRet; } void xorcode (char * szBuffer, char cKey) { for (size_t i = 0 ; i < strlen (szBuffer); i++) { szBuffer[i] ^= cKey; } } int main () { WriteFile((char *)"rk.ini" , (char *)"This is a string!" ); char * szBuffer = ReadFile((char *)"rk.ini" ); printf ("%s\r\n" , szBuffer); system("pause" ); return 0 ; }
C++类和封装 main.cpp:
1 2 3 4 5 6 7 8 9 10 11 12 13 14 15 16 17 18 19 20 21 22 23 24 25 26 27 28 29 30 31 32 33 34 35 36 37 38 39 40 41 42 43 44 45 46 47 48 49 50 51 52 53 54 55 56 57 58 59 60 61 62 63 64 65 66 67 68 69 70 71 72 73 74 75 76 77 78 79 80 81 82 #include <iostream> #include <Windows.h> struct Role { void Init () { this ->Hp = 20 ; this ->MaxHp = 30 ; this ->MaxMp = 40 ; this ->Mp = 50 ; } void show () { printf ("%d %d\r\n" , this ->Hp, this ->Mp); } private : int Hp; int Mp; int MaxHp; int MaxMp; }; int main () Role r1; Role r2; r1. Init (); r1. show (); r2. Init (); r2. show (); system ("pause" ); return 0 ; }
运算符重载 main.cpp:
这是我没有进行封装前的状态
1 2 3 4 5 6 7 8 9 10 11 12 13 14 15 16 17 18 19 20 21 22 23 24 25 26 27 28 29 30 31 32 33 34 35 36 37 38 #include <iostream> #include <Windows.h> #include <TlHelp32.h> struct Person { int a; int b; }; Person PersonAddPerson (Person* p1,Person* p2) Person p3; p3. a = p1->a + p2->a; p3. b = p1->b + p2->b; return p3; } int main () Person p1; Person p2; Person p3; p1. a = 1 ; p1. b = 2 ; p2. a = 1 ; p2. b = 3 ; p3 = PersonAddPerson (&p1, &p2); printf ("%d and %d \r\n" , p3. a, p3. b); system ("pause" ); return 0 ; }
可以看到其成功打印了:
C++是如何处理的呢? main.cpp:c++内重载运算符号
第一种:指针类型传:Person operator+(Person * p2)
1 2 3 4 5 6 7 8 9 10 11 12 13 14 15 16 17 18 19 20 21 22 23 24 25 26 27 28 29 30 31 32 33 34 35 36 37 38 39 40 41 42 43 44 45 46 47 48 49 50 51 52 53 54 55 56 57 58 59 60 61 62 63 64 65 66 67 68 69 70 71 72 73 74 75 76 77 78 79 80 81 82 83 84 #include <iostream> #include <Windows.h> #include <TlHelp32.h> struct Person { Person PersonAddPerson (Person* p2) { Person p3; p3. a = this ->a + p2->a; p3. b = this ->b + p2->b; return p3; } Person operator +(Person * p2) { Person p3; p3. a = this ->a + p2->a; p3. b = this ->b + p2->b; return p3; } int a; int b; }; Person PersonAddPerson (Person* p1,Person* p2) Person p3; p3. a = p1->a + p2->a; p3. b = p1->b + p2->b; return p3; } int main () Person p1; Person p2; Person p3; p1. a = 1 ; p1. b = 2 ; p2. a = 1 ; p2. b = 3 ; p3 = p1 + &p2; printf ("%d and %d \r\n" , p3. a, p3. b); system ("pause" ); return 0 ; }
第二种:引用类型传:Person operator+(Person & p2)
main.cpp:
1 2 3 4 5 6 7 8 9 10 11 12 13 14 15 16 17 18 19 20 21 22 23 24 25 26 27 28 29 30 31 32 33 34 35 36 37 38 39 40 41 42 43 44 45 46 47 48 49 50 51 52 53 54 55 56 57 58 59 60 61 62 63 64 65 66 67 68 69 70 71 72 73 74 75 76 77 78 79 80 81 82 83 84 85 86 87 88 89 90 91 92 93 #include <iostream> #include <Windows.h> #include <TlHelp32.h> struct Person { Person PersonAddPerson (Person* p2) { Person p3; p3. a = this ->a + p2->a; p3. b = this ->b + p2->b; return p3; } Person operator +(Person & p2) { Person p3; p3. a = this ->a + p2->a; p3. b = this ->b + p2->b; return p3; } int a; int b; }; Person PersonAddPerson (Person* p1,Person* p2) Person p3; p3. a = p1->a + p2->a; p3. b = p1->b + p2->b; return p3; } int main () Person p1; Person p2; Person p3; p1. a = 1 ; p1. b = 2 ; p2. p3 = p1 + p2; printf ("%d and %d \r\n" , p3. a, p3. b); system ("pause" ); return 0 ; }
Person& p2 和 Person p2之间的区别:Person& p2 —— 引用类型
Person& p2 表示 p2 是一个 Person 类型的引用 。引用在 C++ 中是一个对象的别名 ,它必须在定义时被初始化,并且一旦引用被绑定到某个对象,就不能再改变引用指向另一个对象。引用不会进行对象的拷贝,使用引用时访问的是原始对象 。因此,引用作为参数传递时,效率通常比传递对象的拷贝要高。
1 2 3 4 5 6 7 8 9 10 11 12 13 14 15 16 17 18 19 20 21 22 23 24 25 26 27 示例: #include <iostream> using namespace std;class Person {public : int age; Person (int age) : age (age) {} void printAge () cout << "Age: " << age << endl; } }; void modifyPerson (Person& p) p.age = 30 ; } int main () Person p1 (25 ) ; p1. printAge (); modifyPerson (p1); p1. printAge (); return 0 ; }
引用传递 :在 modifyPerson 函数中,p 是一个引用,因此它直接修改了 p1 对象的值。
关键点:
引用 Person& p2 使得 p2 直接指向传入的对象。
在函数中对 p2 的任何修改都会影响原始对象(传引用 )。
Person p2 —— 对象类型(值传递)
Person p2 表示 p2 是一个 Person 类型的对象(而不是引用)。这意味着它是一个独立的对象,通常会在栈上分配内存。当你将 Person 类型的对象作为参数传递给函数时,通常会发生值传递 ,即对象会被拷贝一份传递给函数。
对象的拷贝会进行成员的逐一拷贝,虽然可以通过拷贝构造函数或移动构造函数进行优化,但在大型对象或复杂结构中,拷贝操作可能会有一定的开销。
1 2 3 4 5 6 7 8 9 10 11 12 13 14 15 16 17 18 19 20 21 22 23 24 25 26 27 示例: #include <iostream> using namespace std;class Person {public : int age; Person (int age) : age (age) {} void printAge () cout << "Age: " << age << endl; } }; void modifyPerson (Person p) p.age = 30 ; } int main () Person p1 (25 ) ; p1. printAge (); modifyPerson (p1); p1. printAge (); return 0 ; }
值传递 :在 modifyPerson 函数中,p 是 p1 的拷贝,修改的是 p 的副本,p1 不会受到影响。
关键点 :
Person p2 是一个独立的对象,传递时会进行拷贝。函数中修改 p2 不会影响原始对象,除非使用指针或引用传递。
p->a 和 p.a 的区别在 C++ 中,p->a 和 p.a 这两种语法虽然看起来很相似,但它们有显著的区别,主要体现在 p 的类型不同。
1. p->a —— 指针访问成员
p->a 是用来访问指针 p 指向的对象的成员 a。p 必须是一个指向对象的指针类型(Person* p)。-> 是指针成员访问运算符 ,它通过指针访问对象的成员。
语法:
p->a 会先通过指针 p 解引用得到对象,然后访问该对象的成员 a。如果 p 是 nullptr 或者指向的对象不存在,那么访问 p->a 会导致运行时错误(如段错误)
2.p.a —— 对象访问成员
p.a 是用来访问对象 p 的成员 a。
p 必须是一个对象 ,而不是指针。
. 是成员访问运算符 ,直接通过对象访问成员。
语法:
p.a 是直接访问对象 p 的成员 a,不需要解引用。
多态 main.cpp:
1 2 3 4 5 6 7 8 9 10 11 12 13 14 15 16 17 18 19 20 21 22 23 24 25 26 27 28 29 30 31 32 33 34 35 36 37 38 39 40 41 #include <iostream> #include <Windows.h> #include <TlHelp32.h> struct Aniaml { public : void Speak () { printf ("动物在说话" ); } }; struct Cat : Aniaml{ void Speak () { printf ("猫在说话" ); } }; void DoSpeak (Aniaml* aniaml) aniaml->Speak (); } int main () Cat cat; DoSpeak (&cat); return 0 ; }
执行结果如下:显示动物在说话。
那么该如何动态多态呢?
加入关键字:virtual
main.cpp:
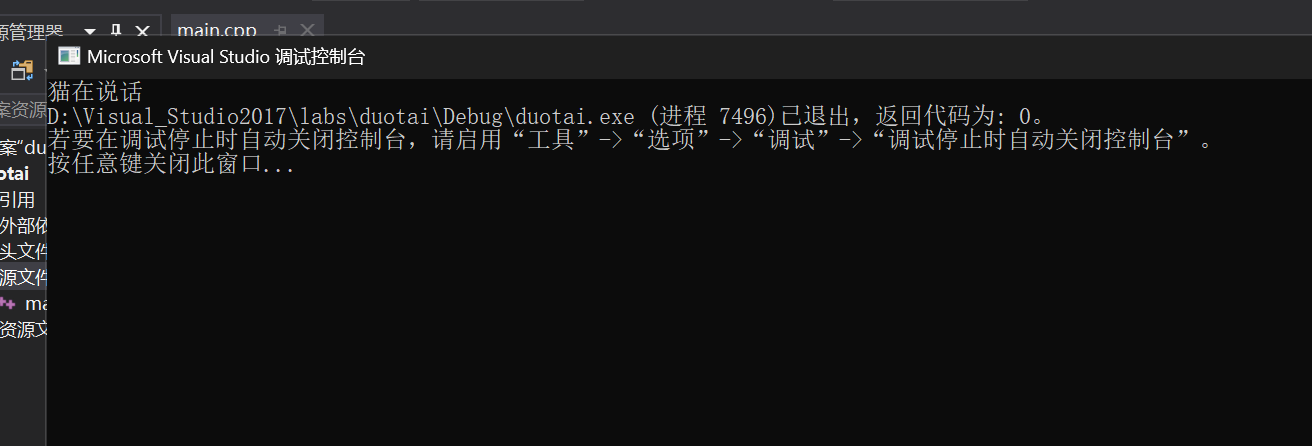
1 2 3 4 5 6 7 8 9 10 11 12 13 14 15 16 17 18 19 20 21 22 23 24 25 26 27 28 29 30 31 32 33 34 35 36 37 38 39 40 41 42 43 44 45 46 47 48 #include <iostream> #include <Windows.h> #include <TlHelp32.h> struct Aniaml { public : virtual void Speak () { printf ("动物在说话" ); } }; struct Cat : Aniaml{ void Speak () { printf ("猫在说话" ); } }; struct Dog : Aniaml{ void Speak () { printf ("狗在说话" ); } }; void DoSpeak (Aniaml* aniaml) aniaml->Speak (); } int main () Cat cat; DoSpeak (&cat); return 0 ; }
执行结果如下:猫在说话
继承 main.cpp:
1 2 3 4 5 6 7 8 9 10 11 12 13 14 15 16 17 18 19 20 21 22 23 24 25 26 27 28 29 30 31 32 33 34 35 36 37 38 39 40 41 #include <iostream> #include <Windows.h> #include <TlHelp32.h> struct person { int age; int sex; void run () void Study () }; struct student : person{ }; struct Woker : person{ int salary; void Work () }; int main () printf ("%d\r\n" ,sizeof (Woker)); return 0 ; }
main.cpp:
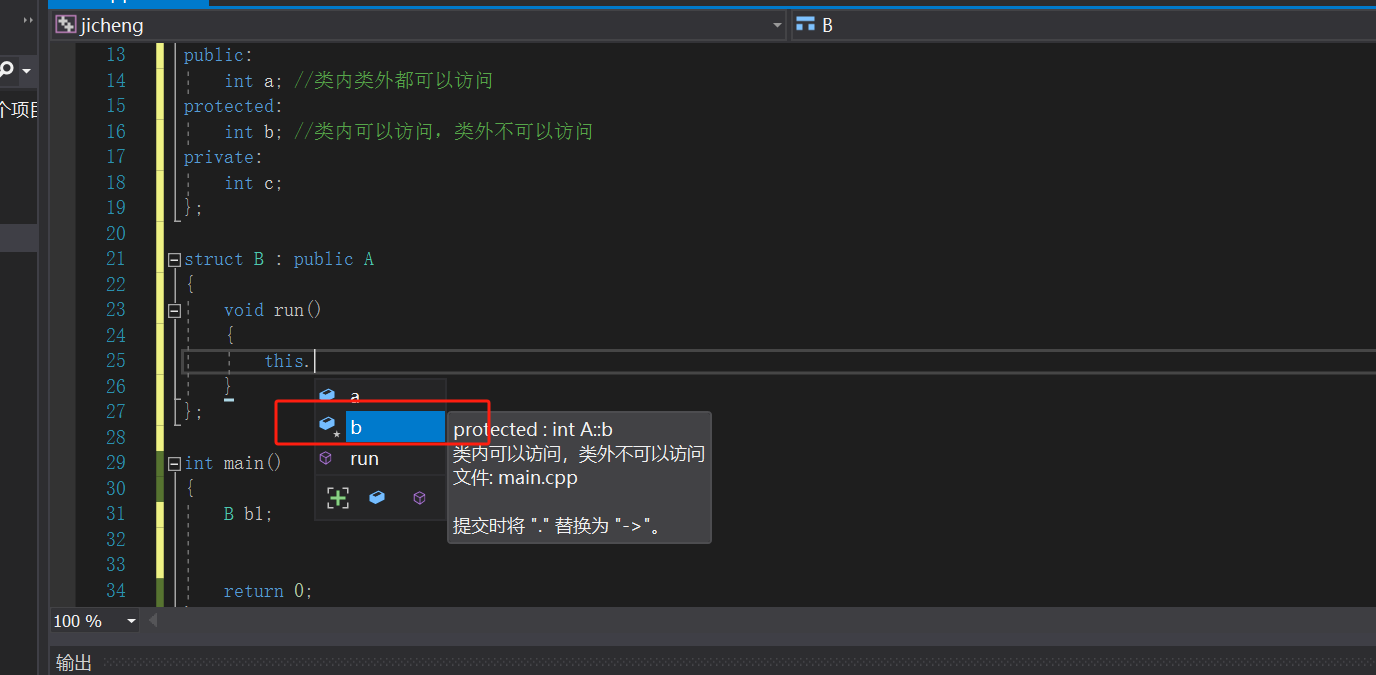
1 2 3 4 5 6 7 8 9 10 11 12 13 14 15 16 17 18 19 20 21 22 23 24 25 26 27 28 29 30 31 32 33 34 35 36 37 #include <iostream> #include <Windows.h> #include <TlHelp32.h> struct A { public : int a; protected : int b; private : int c; }; struct B : public A{ void run () { this ->b = 10 ; } }; int main () B b1; return 0 ; }
protected属性可被继承:
main.cpp:
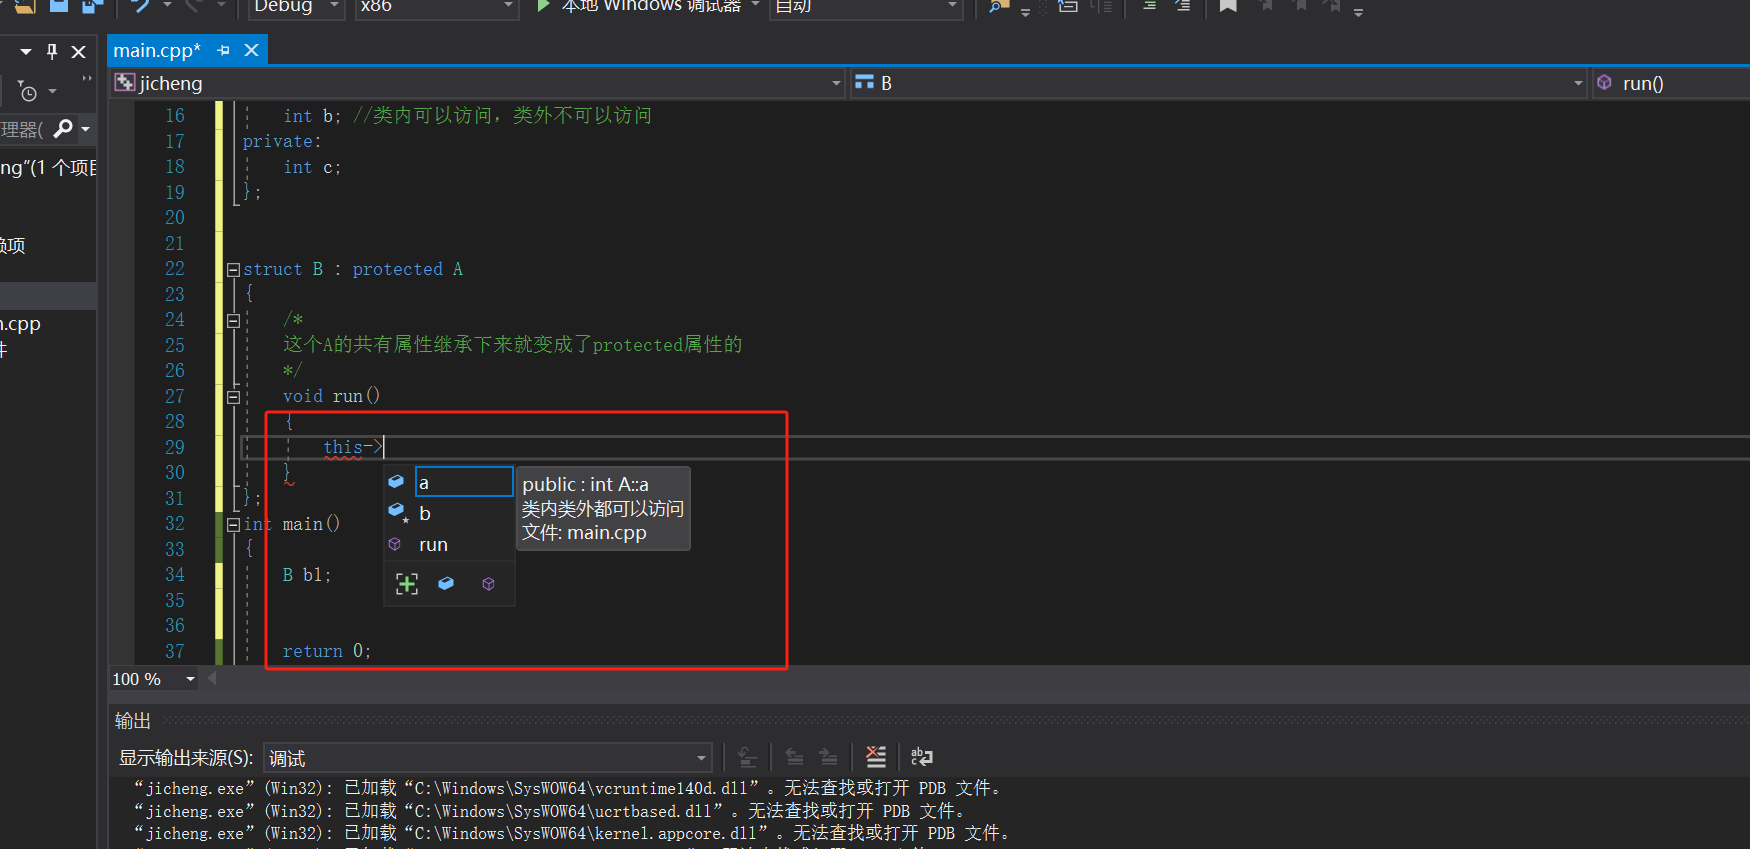
1 2 3 4 5 6 7 8 9 10 11 12 13 14 15 16 17 18 19 20 21 22 23 24 25 26 27 28 29 30 31 32 33 34 35 36 37 38 39 #include <iostream> #include <Windows.h> #include <TlHelp32.h> struct A { public : int a; protected : int b; private : int c; }; struct B : protected A{ void run () { this ->a; } }; int main () B b1; return 0 ; }
可以看到是成功继承了的:
main.cpp:
1 2 3 4 5 6 7 8 9 10 11 12 13 14 15 16 17 18 19 20 21 22 23 24 25 26 27 28 29 30 31 32 33 34 35 36 37 38 39 #include <iostream> #include <Windows.h> #include <TlHelp32.h> struct A { public : int a; protected : int b; private : int c; }; struct B :private A{ void run () { this ->a; } }; int main () B b1; return 0 ; }
异常 main.cpp:最基本的框架 就如下所示:
1 2 3 4 5 6 7 8 9 10 11 12 13 14 15 16 17 18 19 20 21 22 23 24 25 26 #include <iostream> #include <Windows.h> #include <TlHelp32.h> int main () for (int i = 0 ; i < 10000 ; i++) { try { int * pNew = new int [999999 ]; } catch (...) { printf ("发生异常\r\n" ); break ; } } printf ("main end" ); return 0 ; }
有一些异常用上面的基本框架是无法捕获的:比方除0异常,可以进行下面操作:
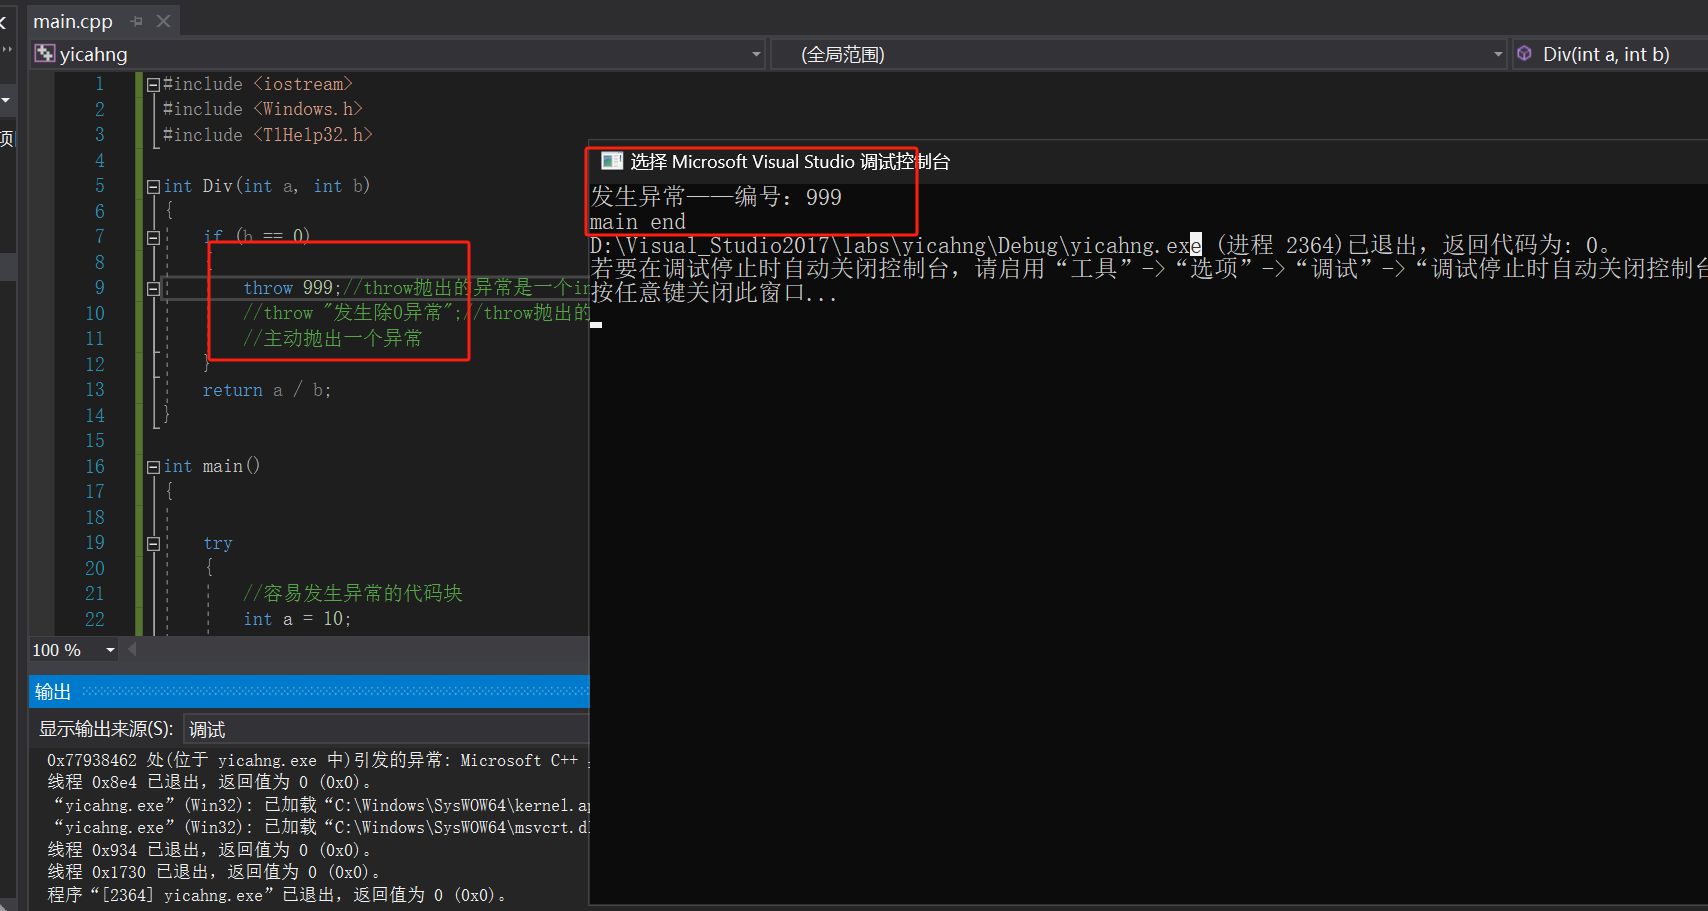
1 2 3 4 5 6 7 8 9 10 11 12 13 14 15 16 17 18 19 20 21 22 23 24 25 26 27 28 29 30 31 32 33 34 35 36 37 38 39 40 41 42 43 #include <iostream> #include <Windows.h> #include <TlHelp32.h> int Div (int a, int b) if (b == 0 ) { throw "发生除0异常" ; } return a / b; } int main () try { int a = 10 ; int b = 0 ; int c = Div (a, b); } catch (int exc) { printf ("发生异常——编号:%d\r\n" , exc); } catch (const char * exc) { printf ("发生异常——异常说明:%s\r\n" , exc); } printf ("main end" ); return 0 ; }
运行结果如下:
1 2 3 4 5 6 7 8 9 10 11 12 13 14 15 16 17 18 19 20 21 22 23 24 25 26 27 28 29 30 31 32 33 34 35 36 37 38 39 40 41 42 43 44 45 46 47 48 49 #include <iostream> #include <Windows.h> #include <TlHelp32.h> int Div (int a, int b) try { if (b == 0 ) { throw "发生除0异常" ; } } catch (int exc) { printf ("Div发生异常" ); return -1 ; } return a / b; } int main () try { int a = 10 ; int b = 0 ; int c = Div (a, b); } catch (int exc) { printf ("发生异常——编号:%d\r\n" , exc); } catch (const char * exc) { printf ("发生异常——异常说明:%s\r\n" , exc); } printf ("main end" ); return 0 ; }
捕获如下:
